Autoflower Hydroponic Grow Guide: How to Grow Autoflowers in Hydroponics
Growing autoflowers in hydroponics can seem intimidating at first, especially if you are used to traditional soil growing methods. Many beginners struggle with slow growth, inconsistent feeding, or root problems because hydro systems respond quickly to environmental changes. The good news is that autoflower hydroponic setups are often simpler and more efficient than growers expect when managed correctly. With stable pH levels, proper oxygenation, and balanced nutrients, hydroponic autoflowers commonly grow faster and produce heavier harvests indoors. In this guide, you will learn how to set up, feed, train, and harvest hydroponic autoflowers while avoiding the mistakes that commonly slow new growers down.
Article Insights
- Most hydroponic autoflowers finish within 8–12 weeks from seed depending on genetics and environmental conditions.
- Deep Water Culture (DWC) is one of the easiest hydroponic systems for beginners because it provides strong root oxygenation and simple maintenance.
- Hydroponic cannabis typically performs best with pH levels between 5.5 and 6.5 and reservoir temperatures between 18–21°C.
- Autoflowers usually prefer lighter feeding schedules than photoperiod strains, especially during early vegetative growth.
- Strong airflow, stable humidity, and balanced light intensity all play a major role in preventing root problems and improving yields.
- Results often vary based on genetics, water quality, grow environment, and how consistently the system is maintained.
- Article Insights
- Can You Grow Autoflowers Hydroponically Successfully?
- Choosing the Best Autoflower Hydroponic Setup
- How to Grow Autoflowers in Hydroponics Step by Step
- Autoflower Hydroponic Feeding Chart and Nutrient Schedule
- Maximizing Yield and Harvest Quality in an Autoflower Hydroponic Grow
- Frequently Asked Questions About Autoflower Hydroponic Growing
- Conclusion
Can You Grow Autoflowers Hydroponically Successfully?
Autoflowering cannabis strains are well suited to hydroponic cultivation because they thrive in stable environments with rapid nutrient uptake. Unlike photoperiod strains, autoflowers transition into flowering automatically based on age rather than light cycle changes. This fast lifecycle pairs extremely well with hydroponics because roots receive constant access to oxygenated nutrient solutions.
When your environment is stable and your feeding schedule is balanced, hydroponic autoflowers can grow aggressively while also producing larger and denser buds than many soil-grown plants.
What Makes Autoflowers Different From Photoperiod Cannabis
Autoflowers are bred using Cannabis ruderalis genetics, which gives them the ability to flower automatically after a few weeks of growth. Photoperiod strains rely on light cycle changes to trigger flowering, while autoflowers begin flowering on their own regardless of lighting schedule.
This shorter lifecycle is one reason many beginner growers choose autoflowers. Most strains finish within 8 to 12 weeks from seed, making them fast, efficient, and beginner friendly.
I also find that autoflowers work especially well in hydro because they spend less time recovering from stress. The rapid nutrient uptake in hydroponics supports their accelerated growth rate while also helping plants build strong root systems early.
Can You Grow Autoflower in Hydroponic Systems as a Beginner?
Yes, beginners can absolutely grow autoflowers hydroponically. In fact, many modern hydroponic systems are easier to manage than people expect.
The biggest misconception is that hydroponics is complicated. The reality is that hydro simply requires consistency. Once you learn how to manage pH, EC, and water temperature, the process becomes predictable.
I usually recommend a simple Deep Water Culture system for first-time growers because it allows you to monitor root health directly while also teaching you how nutrients affect plant growth.
Benefits of an Autoflower Hydroponic Grow Compared to Soil
Hydroponics offers several advantages over soil cultivation.
Key benefits include:
- Faster vegetative growth
- Increased nutrient absorption
- Cleaner root environments
- Larger yields indoors
- Easier nutrient control
- Reduced risk of soil pests
I consistently notice tighter internodal spacing and heavier bud development when growing autoflowers hydroponically. This also leads to improved resin production and stronger terpene profiles when environmental conditions are dialed in correctly.
Hydroponic Autoflowers vs Soil Grows: Which Produces Bigger Yields?
Hydroponic autoflowers generally produce larger yields than soil-grown plants under indoor conditions. In my own grows, I consistently see hydroponic plants finish around 15–30% heavier than comparable soil-grown autoflowers when environmental conditions remain stable.
| Growing Medium | Average Indoor Yield | Growth Speed | Nutrient Control | Difficulty |
| Hydroponics | 50–150g per plant | Fast | High | Moderate |
| Soil | 40–120g per plant | Moderate | Medium | Easy |
| Coco Coir | 50–140g per plant | Fast | High | Moderate |
In soil, roots spend energy searching for nutrients and oxygen. In hydroponics, everything is already accessible. This allows the plant to focus more energy on foliage growth, bud formation, and resin production.
While experienced organic soil growers can still produce exceptional cannabis, hydroponic systems tend to outperform soil in terms of growth speed and harvest weight.
Common Challenges When Growing Autoflowers in Hydroponics
Hydroponics responds quickly to mistakes. If your pH drifts out of range or nutrient levels become too strong, your plants react fast.
The most common issues I see are:
- Overfeeding seedlings
- High reservoir temperatures
- Poor oxygenation
- pH instability
- Root rot
- Nutrient burn
The good news is that hydroponics also allows you to correct problems quickly once you identify the cause.
Choosing the Best Autoflower Hydroponic Setup
Your hydroponic setup plays a huge role in determining how easy your grow will be. Autoflowers prefer stable conditions and minimal stress, so simple systems often work best.
Best Hydroponic Systems for Growing Autoflowers Indoors
Several hydroponic systems work well for autoflower cannabis cultivation.
The most common options include:
- Deep Water Culture (DWC)
- Nutrient Film Technique (NFT)
- Ebb and Flow systems
- Drip irrigation systems
- Aeroponics
For beginners, I almost always recommend DWC because it is affordable, effective, and easy to maintain.
Why DWC Is the Most Popular Autoflower Hydroponic Setup
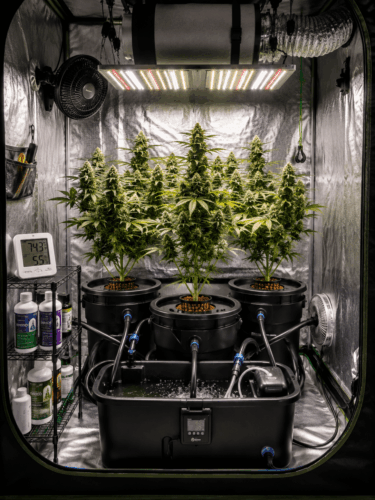
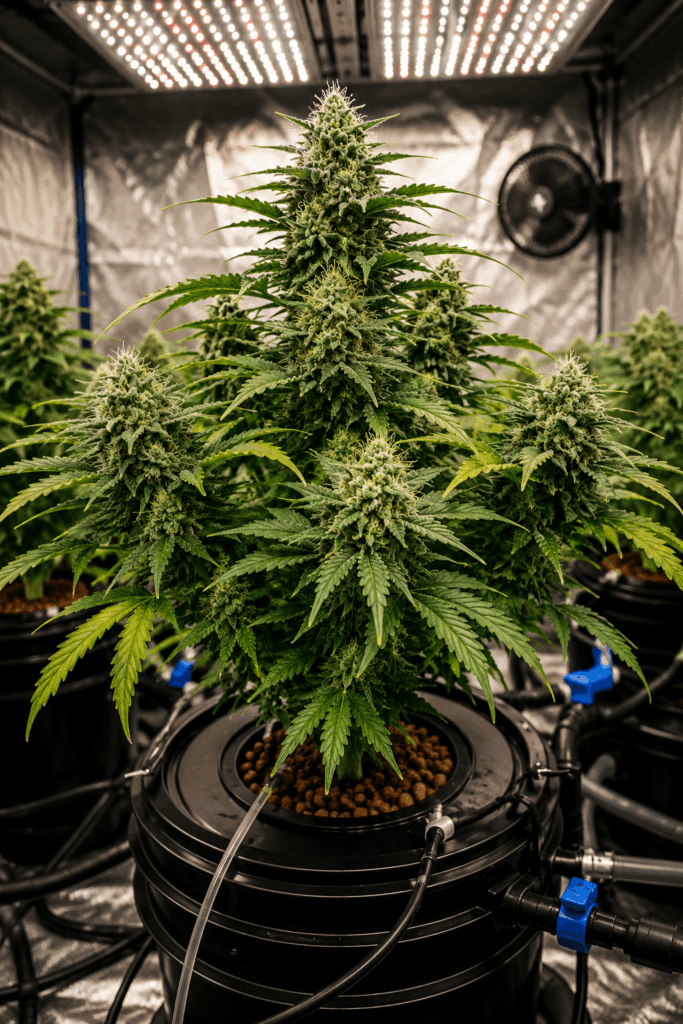
DWC systems suspend plant roots directly into an oxygen-rich nutrient reservoir. Air stones continuously oxygenate the water, allowing roots to absorb nutrients rapidly.
This setup is popular because it combines simplicity with explosive growth rates. Once roots hit the reservoir, plants often begin growing noticeably faster within days.
I personally like DWC because it gives me direct control over root health, nutrient levels, and water conditions. I also learned pretty quickly that warm reservoirs can destroy a healthy root zone almost overnight. During one of my early hydro runs, reservoir temperatures crept above 24°C for several days and the roots turned brown fast. Since then, I always monitor water temperatures daily because hydroponic systems react quickly to environmental swings.
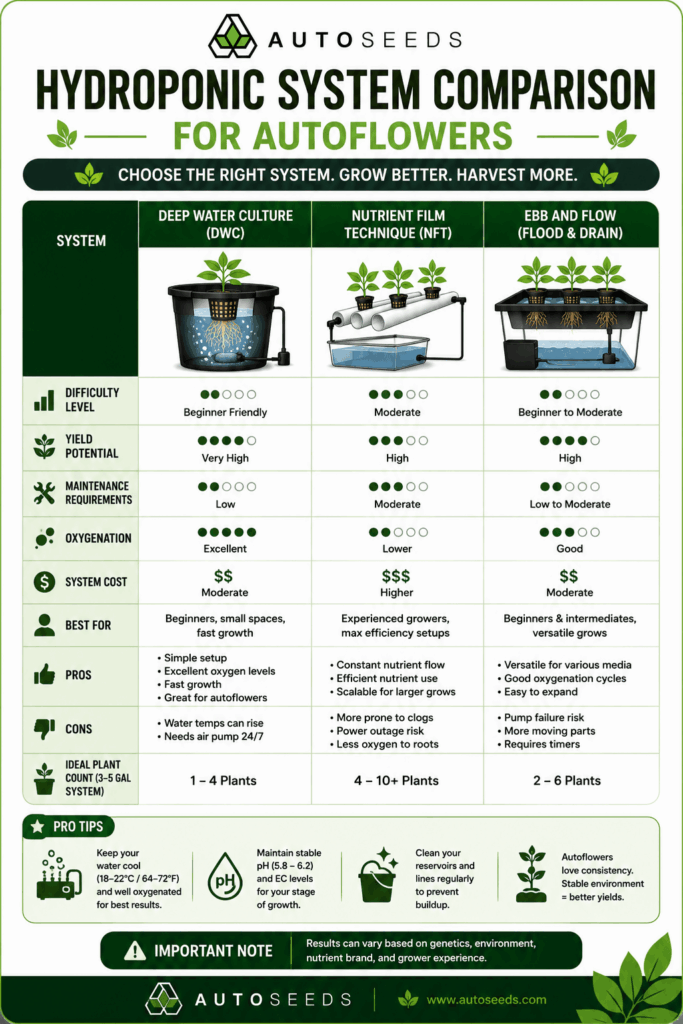
Deep Water Culture (DWC) vs NFT vs Ebb and Flow for Autoflowers
Each hydroponic system has strengths and weaknesses.
DWC is best for beginners because it is stable and low maintenance.
NFT systems use a shallow stream of nutrient solution flowing over roots continuously. They are efficient but less forgiving during pump failures.
Ebb and Flow systems periodically flood and drain the root zone. These systems provide strong oxygenation while also supporting vigorous root growth.
For most home growers, DWC strikes the best balance between simplicity and performance.
How to Build a Simple Autoflower Hydroponic Setup at Home
A basic DWC setup can be built using:
- A lightproof bucket or reservoir
- Net pots
- Clay pebbles
- Air pump and air stones
- pH and EC meters
- LED grow lights
I always recommend using black or opaque reservoirs because light leaks encourage algae growth.
Essential Equipment Needed for a Hydroponic Autoflower Grow
Reliable equipment makes hydroponics easier and more consistent.
Important tools include:
- Digital pH meter
- EC or PPM meter
- Thermometer and hygrometer
- Oscillating fans
- Carbon filter
- Reservoir thermometer
I never cut corners on pH and EC meters because inaccurate readings can create nutrient problems quickly.
Choosing the Right Grow Lights, Air Pumps, and Growing Mediums
Lighting directly affects yield potential.
Full-spectrum LED grow lights are my preferred choice because they produce less heat while also delivering strong PAR output for dense flower production. During flowering, I usually aim for around 600–900 PPFD at canopy level because this intensity range supports strong bud development without causing light stress in most autoflower strains.
I also pay attention to Daily Light Integral (DLI), which measures the total amount of usable light plants receive each day. Autoflowers generally perform well within a DLI range of 35–45 during flowering under a 20/4 light schedule.
Early in my hydro grows, I chased maximum light intensity thinking more light automatically meant bigger yields. Instead, I stressed several plants badly because the environment and nutrient uptake could not keep up with the extra PPFD. Autoflowers especially prefer balance over brute force.
| Growth Stage | Recommended PPFD | Target DLI |
| Seedling | 150–300 PPFD | 10–15 DLI |
| Vegetative | 300–600 PPFD | 20–30 DLI |
| Flowering | 600–900 PPFD | 35–45 DLI |
| Grow Light Type | Average PPFD Range | Heat Output | Efficiency | Best Use |
| Full-Spectrum LED | 600–900 PPFD | Low | High | Indoor autoflower grows |
| HPS | 700–1000 PPFD | High | Moderate | Large flowering rooms |
| CMH | 500–800 PPFD | Moderate | Moderate | Balanced vegetative growth |
For growing mediums, I prefer clay pebbles or rockwool cubes in hydroponic systems. Both provide strong aeration while also supporting root stability.
How to Grow Autoflowers in Hydroponics Step by Step
Growing hydroponic autoflowers becomes straightforward once you establish a consistent routine.
Germinating Autoflower Seeds for Hydroponic Growing
I usually germinate seeds using moist paper towels or directly in rockwool cubes.
Once the taproot appears, the seedling can be placed into the hydroponic setup carefully. Seedlings prefer mild nutrients early, so I keep EC levels low during the first week.
Transferring Seedlings Into a Hydroponic System Safely
Autoflowers dislike excessive stress during early growth.
When transferring seedlings into hydro, I avoid touching the roots directly. I also keep humidity relatively high during the first few days to reduce transplant shock.
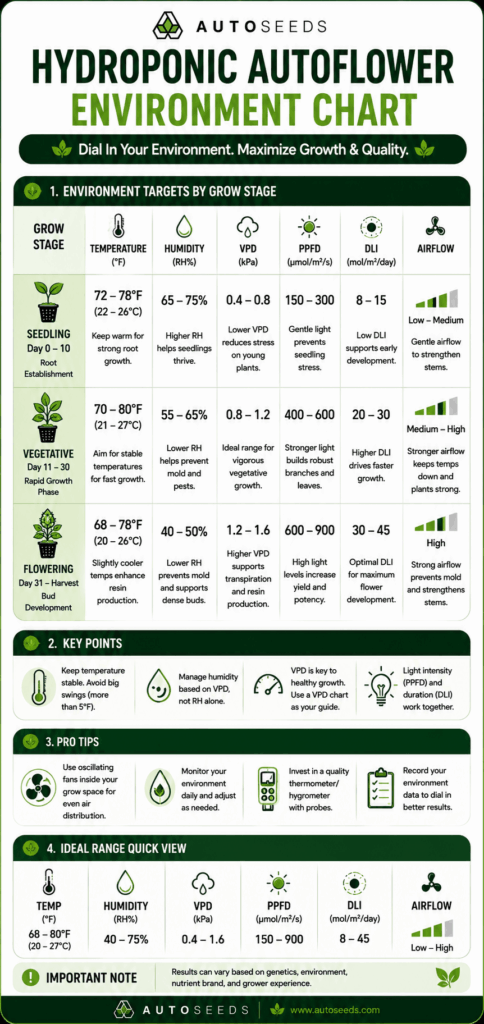
Managing Temperature, Humidity, and Airflow for Faster Growth
Environmental control is one of the most important factors in hydroponic cultivation.
Ideal conditions include:
- Temperatures between 20–26°C
- Relative humidity between 50–70%
- Strong but gentle airflow
- Reservoir temperatures below 22°C
I also monitor Vapor Pressure Deficit (VPD) because it helps regulate transpiration and nutrient uptake. During vegetative growth, I aim for a VPD range between 0.8 and 1.2 kPa, while flowering plants typically respond better between 1.2 and 1.5 kPa.
| Growth Stage | Temperature | Humidity | Recommended VPD |
| Seedling | 22–25°C | 65–70% | 0.6–0.8 kPa |
| Vegetative | 22–26°C | 55–65% | 0.8–1.2 kPa |
| Flowering | 20–25°C | 40–50% | 1.2–1.5 kPa |
Stable environments help autoflowers focus energy on growth rather than stress recovery.
Best Light Schedule for Hydroponic Autoflowers
Autoflowers can thrive under long light schedules.
Most growers use:
- 18/6
- 20/4
- 24/0
I usually run 20 hours of light and 4 hours of darkness because it provides strong growth while also giving equipment and plants a short recovery period.
Pro Tips for Managing Hydroponic Autoflower Environments
Over the years, a few small habits have consistently improved my hydroponic grows:
- Keep backup air stones and air pumps ready in case equipment fails
- Maintain strong airflow below the canopy to prevent stagnant humidity
- Avoid dramatic nutrient adjustments overnight
- Watch leaf posture daily because healthy leaves often “pray” upward toward the light
- Clean reservoirs and tubing regularly to prevent biofilm buildup
| Environmental Factor | Ideal Range | Common Beginner Mistake | Result |
| Reservoir Temperature | 18–21°C | Allowing water to exceed 24°C | Root rot and slow growth |
| Relative Humidity | 40–70% depending on stage | Excess humidity during flowering | Mold and bud rot |
| Airflow | Constant gentle circulation | Weak airflow below canopy | Stale air and weak stems |
| pH Stability | 5.5–6.5 | Large pH swings | Nutrient lockout |
Hydroponics rewards consistency more than constant tweaking. Many beginners hurt yields by making too many changes too quickly.
Many first-time growers choose autoflower seeds for beginners because they are easier to manage than photoperiod strains and flower automatically without light cycle changes. Combined with a simple hydroponic setup like DWC, beginner-friendly autoflowers can grow quickly while also teaching new growers how to monitor pH, EC, and root health. Stable genetics and simple feeding schedules are often the best starting point for learning hydroponic cannabis cultivation.
How to Train Autoflowers Without Slowing Growth
Low-stress training is one of the safest methods for increasing yields.
I gently bend branches outward to improve canopy exposure and encourage even bud development. This also allows lower bud sites to receive more light.
High-stress techniques like topping can work, but they carry greater risk with autoflowers because of the short vegetative phase.
Preventing Root Rot and Other Common Hydroponic Problems
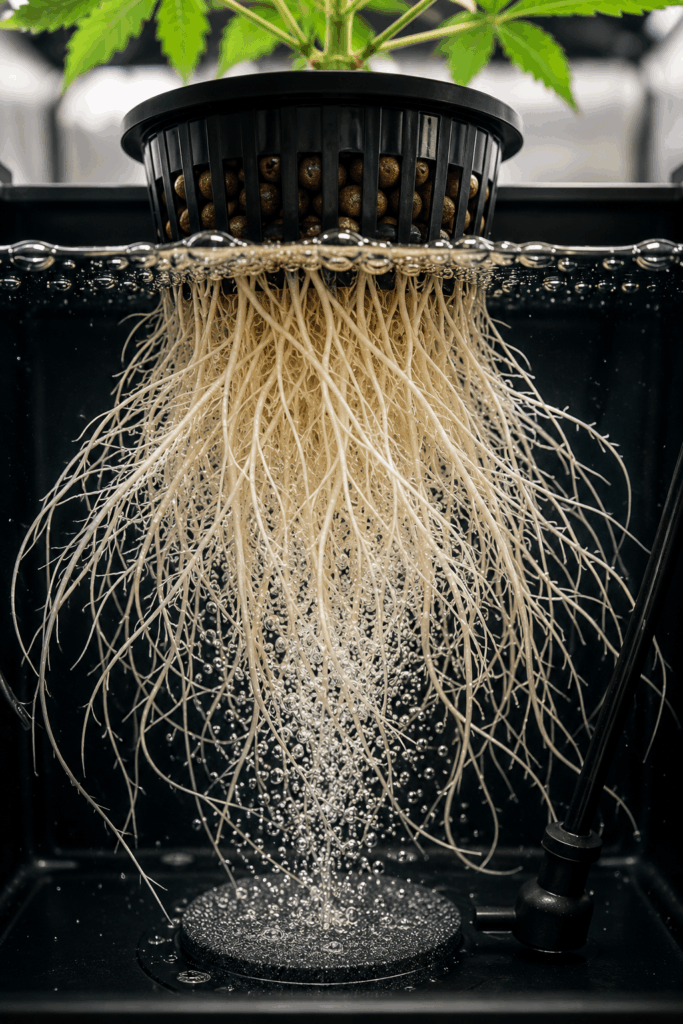
Root rot is usually caused by poor oxygenation or warm reservoir temperatures.
Healthy roots should appear white and smell fresh. Brown, slimy roots are often signs of infection. One mistake I made years ago was assuming slightly discolored roots were harmless nutrient stains when in reality oxygen levels had dropped too low. Within days, growth slowed dramatically and the plants stopped drinking water properly.
Water Quality and Why It Matters in Hydroponics
Water quality directly affects nutrient stability, pH consistency, and root health. Many beginner growers overlook this completely.
I prefer using reverse osmosis (RO) water because it gives me full control over mineral content. Tap water can work, but hard water with high PPM levels often creates nutrient imbalances.
As a general rule, I aim for:
- Starting water below 150 PPM
- Water temperature between 18–21°C
- Chlorine-free reservoirs
- Strong aeration at all times
If your tap water contains chloramine, letting water sit overnight will not remove it. In those cases, filtration becomes important.
| Water Source | Average PPM | Pros | Cons |
| RO Water | 0–20 PPM | Full nutrient control | Requires filtration system |
| Tap Water | 100–400 PPM | Convenient | May contain chlorine or excess minerals |
| Distilled Water | Near 0 PPM | Very clean | More expensive long term |
| Water Quality Issue | Common Cause | Effect on Plants |
| High PPM Water | Hard tap water | Nutrient imbalance |
| Chlorine Exposure | Untreated municipal water | Root stress and microbial damage |
| Warm Reservoirs | Poor cooling or hot grow rooms | Root rot risk |
| Poor Oxygenation | Weak air pumps | Slow growth and drooping plants |
I prevent root problems by:
- Keeping reservoirs cool
- Maintaining strong aeration
- Cleaning equipment regularly
- Using beneficial microbes
How to Fix Common Hydroponic Autoflower Problems (Yellow Leaves, Root Rot, and Slow Growth)
Yellow leaves often indicate nutrient deficiencies, pH imbalance, or overwatering stress.
Slow growth can result from:
- Low oxygen levels
- Incorrect EC levels
- Poor lighting
- Root damage
The first thing I always check is pH because nutrient lockout is one of the most common causes of hydroponic problems.
Autoflower Hydroponic Feeding Chart and Nutrient Schedule
Feeding hydroponic cannabis requires precision and consistency. Unlike soil, hydroponics provides no nutrient buffer, which means your plants react quickly to changes in feeding strength.
Understanding pH and EC Levels in Hydroponic Cannabis Growing
pH controls nutrient availability.
For hydroponic cannabis, I maintain pH levels between 5.5 and 6.5 depending on the growth stage.
EC measures nutrient concentration. Higher EC levels provide more nutrients, but excessive feeding can burn autoflowers quickly.
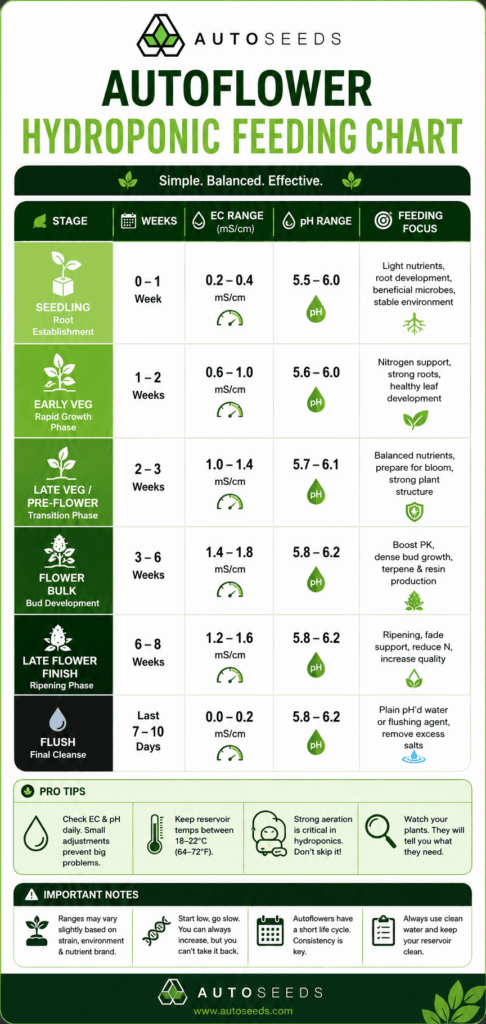
Complete Autoflower Hydroponic Feeding Chart From Seed to Harvest
A basic autoflower hydroponic feeding chart looks like this:
| Growth Stage | EC Range | pH Range | Nutrient Focus |
| Week 1 Seedling | 0.4–0.6 | 5.8–6.0 | Root stimulators and mild base nutrients |
| Week 2–3 Vegetative | 0.8–1.0 | 5.8–6.2 | Nitrogen and calcium support |
| Week 4–5 Transition | 1.0–1.2 | 5.9–6.2 | Balanced bloom transition nutrients |
| Week 6–8 Flowering | 1.2–1.6 | 6.0–6.3 | PK boosters and bloom nutrients |
| Final Flush | Below 0.4 | 6.0–6.2 | Clean pH-balanced water |
Over the years, I have found that autoflowers generally prefer lighter feeding than photoperiod strains. Many nutrient brands recommend aggressive EC levels that can easily overwhelm young plants, especially in DWC systems.
I always increase nutrient strength gradually rather than making sudden adjustments. One thing I noticed after years of growing autoflowers is that they often react negatively to aggressive feeding schedules copied from photoperiod grows. Smaller autoflower root systems simply do not tolerate heavy EC spikes as well.
Pro Tips for Feeding Hydroponic Autoflowers
- Increase EC slowly in increments of 0.1–0.2
- Check reservoir pH daily because hydro systems fluctuate quickly
- Replace nutrient solution every 7 days
- Avoid chasing deficiencies with multiple additives simultaneously
- Keep Cal-Mag available during rapid vegetative growth under LEDs
| Feeding Mistake | What Happens | Recommended Fix |
| Overfeeding seedlings | Burnt leaf tips and stunted growth | Reduce EC immediately |
| Ignoring pH drift | Nutrient deficiencies appear | Rebalance pH gradually |
| Using old nutrient solution | Salt buildup and instability | Replace reservoir weekly |
| Adding too many supplements | Nutrient lockout | Simplify feeding schedule |
| Skipping Cal-Mag under LEDs | Rust spots and weak growth | Supplement calcium and magnesium |
A steady feeding schedule almost always performs better than overcomplicated nutrient programs filled with unnecessary supplements.
Best Nutrients for Hydroponic Autoflowers
Hydroponic nutrients should contain balanced macro and micronutrients.
Important nutrients include:
- Nitrogen
- Phosphorus
- Potassium
- Calcium
- Magnesium
I also supplement Cal-Mag under LED lighting because autoflowers commonly require additional calcium and magnesium during rapid growth.
How Often to Feed Autoflowers in Hydroponics
Hydroponic systems feed plants continuously because roots remain in contact with nutrient solution.
I replace reservoirs every 7 days to maintain nutrient balance while also preventing salt buildup.
Daily monitoring helps identify nutrient fluctuations before they become serious problems.
Signs of Nutrient Burn, Deficiencies, and pH Imbalances
Nutrient burn usually appears as burnt leaf tips and dark green foliage.
Calcium deficiencies often cause rust spots or curling leaves.
Incorrect pH can mimic deficiencies because nutrients become unavailable even when present in the reservoir.
How to Fix Common Hydroponic Autoflower Problems Fast
The fastest way to solve hydroponic problems is to identify the root cause quickly.
My troubleshooting process is simple:
- Check pH
- Check EC
- Inspect roots
- Review environmental conditions
- Adjust nutrients slowly
Hydroponics responds quickly to corrections, which is one reason experienced growers love the system.
When and How to Flush Hydroponic Autoflowers Before Harvest
Flushing removes excess nutrients before harvest.
During the final 7 to 14 days, I use clean pH-balanced water while allowing the plant to consume stored nutrients naturally.
This process improves flavor, smoothness, and ash quality after drying.
Maximizing Yield and Harvest Quality in an Autoflower Hydroponic Grow
Hydroponics gives you the ability to push autoflowers toward their full genetic potential.
How Much Can Hydroponic Autoflowers Yield Indoors?
Yield depends on genetics, environment, and lighting intensity.
Under strong LED lighting, healthy hydroponic autoflowers can produce between 50 and 150 grams per plant indoors.
Experienced growers sometimes achieve even larger harvests with optimized DWC systems.
One of the biggest advantages of hydroponic growing is the ability to maximize harvest size in limited indoor spaces. Pairing your setup with high yield autoflower seeds can help you take full advantage of faster vegetative growth, aggressive root development, and optimized nutrient uptake. Under strong LED lighting and stable feeding schedules, high-yielding autoflower genetics commonly produce larger harvests in hydro compared to traditional soil grows.
Best Techniques for Increasing Bud Density and Resin Production
Several techniques improve flower quality significantly.
These include:
- Maintaining strong light intensity
- Keeping stable temperatures
- Using low-stress training
- Preventing nutrient deficiencies
- Lowering humidity during flowering
Consistent environmental control is one of the biggest factors affecting resin production.
When to Harvest Hydroponic Autoflowers for Maximum Potency
Trichome development determines harvest timing.
I use a jeweler’s loupe to inspect trichomes closely. A 60x magnification loupe or digital microscope works best because it allows you to inspect resin heads accurately without guessing harvest timing.
From experience, harvesting too early dramatically reduces terpene depth and cannabinoid maturity. I usually wait until at least 80–90% of trichomes appear cloudy before considering harvest.
- Clear trichomes indicate immature flowers
- Milky trichomes represent peak THC levels
- Amber trichomes produce a heavier sedative effect
Most growers harvest when the majority of trichomes are cloudy with a small percentage turning amber.
Drying and Curing Hydroponic Cannabis Properly
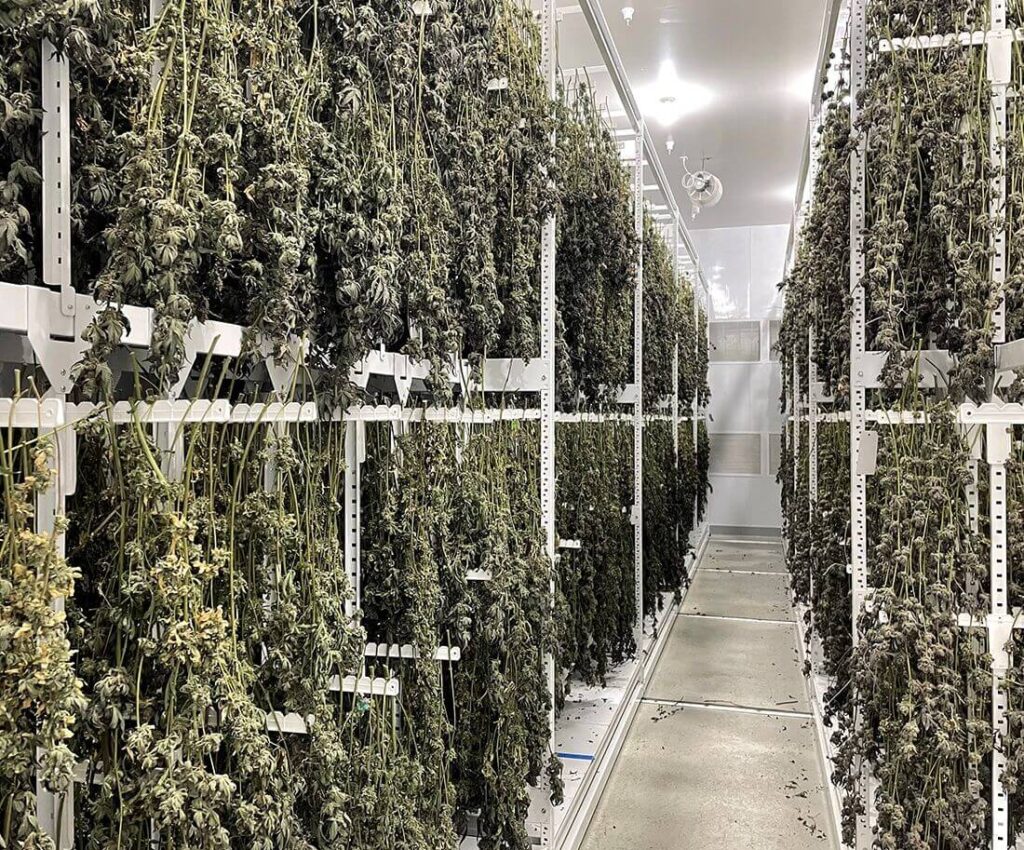
Drying and curing are just as important as cultivation.
I dry harvested branches slowly in a dark room at around 18–21°C with moderate airflow.
After drying, buds are cured in airtight jars while opened daily during the first few weeks.
Proper curing improves terpene expression, smoothness, aroma, and overall smoking quality.
Final Tips for Growing Bigger and Healthier Hydroponic Autoflowers
The best hydroponic growers focus on consistency.
Small adjustments made carefully over time produce better results than constant major changes.
I always encourage beginners to keep detailed notes during every grow cycle. Tracking pH, EC, feeding schedules, and environmental conditions helps you identify patterns while also improving future harvests.
Frequently Asked Questions About Autoflower Hydroponic Growing
Can Beginners Grow Autoflowers Hydroponically?
Yes. Simple DWC systems are beginner friendly and highly effective once you understand basic pH and nutrient management.
What Is the Best pH for Hydroponic Autoflowers?
The ideal pH range is between 5.5 and 6.5, depending on the growth stage and nutrient availability.
How Long Do Hydroponic Autoflowers Take to Grow?
Most hydroponic autoflowers finish within 8 to 12 weeks from seed.
Are Hydroponic Autoflowers Stronger Than Soil-Grown Plants?
Potency depends mainly on genetics and cultivation quality, but hydroponics often produces denser flowers with high cannabinoid and terpene content.
What Nutrients Do Hydroponic Autoflowers Need Most?
Autoflowers require balanced levels of nitrogen, phosphorus, potassium, calcium, and magnesium throughout the grow cycle.
Conclusion
Growing autoflowers hydroponically is one of the fastest and most efficient ways to cultivate cannabis indoors. Once you understand how hydroponic systems work, the process becomes highly rewarding and surprisingly manageable even for beginners.
An autoflower hydroponic setup gives you direct control over nutrients, oxygen, water, and environmental conditions while also helping plants reach their full genetic potential. Faster growth, cleaner roots, larger yields, and dense resin production are all possible when your system is balanced correctly.
Like any cultivation method, hydroponics comes with a learning curve. You will make adjustments, refine your feeding schedule, and improve your environment over time. That process is part of becoming a better grower.
The key is consistency. Monitor your pH, maintain healthy roots, keep your reservoir clean, and avoid overfeeding your plants. Once you dial in the basics, hydroponic autoflowers can produce top-shelf cannabis that rivals dispensary-quality flower.
Whether you are building your first DWC bucket or optimizing a full hydroponic grow room, the fundamentals remain the same. Healthy roots create healthy plants, and healthy plants produce exceptional harvests.