
Penicillium Cannabis: How to Identify, Eliminate and Prevent It on Autoflowers
Penicillium is one of the most destructive fungal contaminants that can affect autoflower cannabis, capable of turning healthy, resin-covered buds into unusable flower in a matter of days. While Penicillium spores are naturally present in the environment, they only become a serious problem when moisture, poor airflow, and dense flowers create the perfect conditions for mold to develop. Because autoflowers have a short, fixed life cycle, there is often little time to correct problems once an infection takes hold.
Over the years, I’ve found that preventing Penicillium is far easier than trying to eliminate it after it appears. The key is recognising the early warning signs, responding quickly, and maintaining the right growing conditions throughout the entire lifecycle.
In this guide, you’ll learn how to identify Penicillium on autoflower cannabis, eliminate contamination safely, and prevent future outbreaks from seedling to harvest, drying, curing, and long-term storage.
What is Penicillium?
Penicillium is a genus of fungi commonly found in soil, air, decaying organic matter, and indoor growing environments. Like many molds, it reproduces by releasing microscopic spores that are invisible to the naked eye. These spores spread easily through air circulation, dust, contaminated tools, clothing, growing media, water, and plant material, allowing them to establish themselves wherever conditions are suitable.
Because these spores are so widespread, they are almost always present in a grow space at low levels. Problems begin when they land on plant material and encounter the right combination of moisture and organic matter. Under these conditions, spores can begin to colonise surfaces and develop into visible mold, often appearing as fuzzy white, blue, or green growth.
Why Is Penicillium a Threat to Autoflower Cannabis?
For autoflower cannabis growers, Penicillium is one of several molds that can infect developing buds when excess moisture becomes trapped inside dense flowers. Understanding how this fungus develops makes it much easier to prevent problems throughout the growing cycle.
Many modern autoflower cultivars produce large, dense, resin-rich colas that naturally retain moisture, especially during the final weeks of flowering. Under the right environmental conditions, this trapped moisture creates an ideal environment for fungal spores to germinate and spread.
For most indoor grows, maintaining a relative humidity of around 40–50% during late flowering, providing gentle but consistent air circulation, and keeping daytime temperatures between 21–26°C (70–79°F) helps reduce the risk of Penicillium development. However, if humidity remains elevated for extended periods or airflow is restricted, moisture can become trapped deep within the buds. Because fungal growth often begins inside the flower, an infection may be well established before any visible signs appear on the outside.
Unlike photoperiod plants, autoflowers have a fixed life cycle and cannot be held in a vegetative stage while growers correct environmental problems. Once flowering begins, there is limited time to respond. If Penicillium develops during late flower, it can spread quickly and compromise the crop before harvest. In my experience, this makes prevention far more important than attempting to recover infected plants.
Another common issue is that mold rarely appears suddenly. Penicillium typically develops after several small factors combine, such as elevated humidity, restricted airflow, overcrowded plants, or damp plant debris within the canopy. By the time visible signs appear, spores may already be present throughout the grow space.
Once Penicillium infects autoflower buds, the flower is no longer considered safe or suitable for use. Growers risk losing both quality and yield, and in commercial settings, contaminated crops may fail microbial testing. Understanding how Penicillium develops and why autoflowers are vulnerable is essential for protecting plants from one of the most damaging forms of contamination during cultivation and post-harvest handling.
How to Inspect Autoflower Cannabis for Penicillium
Identifying Penicillium early is the best way to protect the rest of your autoflower crop. Unlike some plant diseases that begin on the leaves, Penicillium usually develops inside dense flowers where moisture becomes trapped. Many autoflower strains produce compact, resin-rich colas, making regular inspections essential throughout flowering and during drying.
I never inspect just the top of a bud. Instead, I work methodically from the main cola down through the canopy, checking every area where moisture is most likely to remain. By the time mold is visible across an entire flower, it has often been developing unnoticed for several days.
Step-by-Step Inspection Guide
Follow the same routine each time you inspect your autoflowers.
| Inspection Point | How to Inspect | Healthy Autoflower Bud | Signs of Penicillium |
| Main cola | Look between the flowers without squeezing the bud. | Dense, green flower covered in sparkling trichomes. | White, gray, or blue-green fuzzy growth between the buds. |
| Inside dense flowers | Gently separate the calyxes with clean fingers. | Firm flower with no unusual discoloration. | Hidden mold, soft tissue, or damp areas inside the cola. |
| Sugar leaves | Check where leaves emerge from the flower. | Healthy green leaves coated in resin. | Wilting, browning, or fuzzy growth around the leaf base. |
| Lower canopy | Inspect shaded buds and lower branches. | Dry, healthy flowers with good color. | Early mold growth where airflow is restricted. |
| Drying buds | Check every bud before and during drying. | Fresh terpene aroma with no visible mold. | Musty smell, fuzzy patches, or discolored flowers. |
What Does Penicillium Look Like?
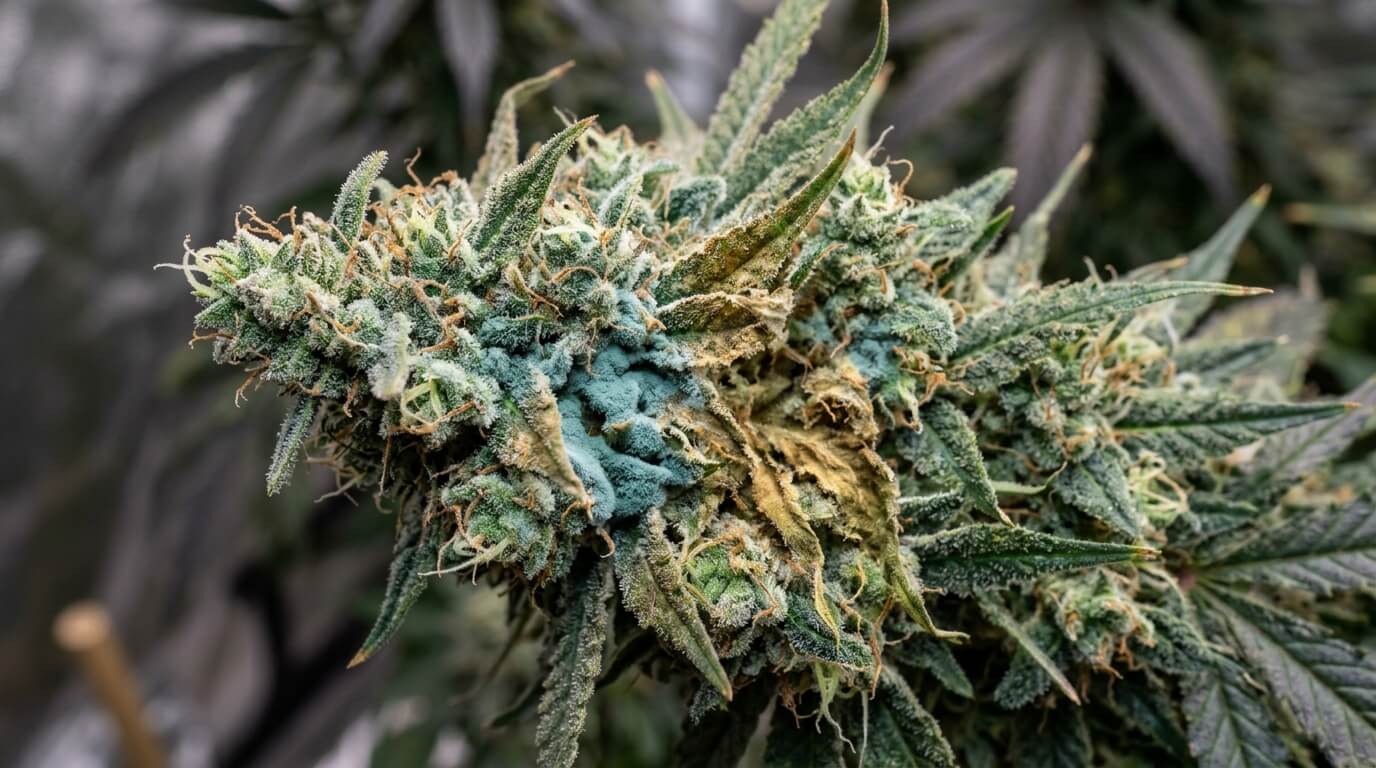
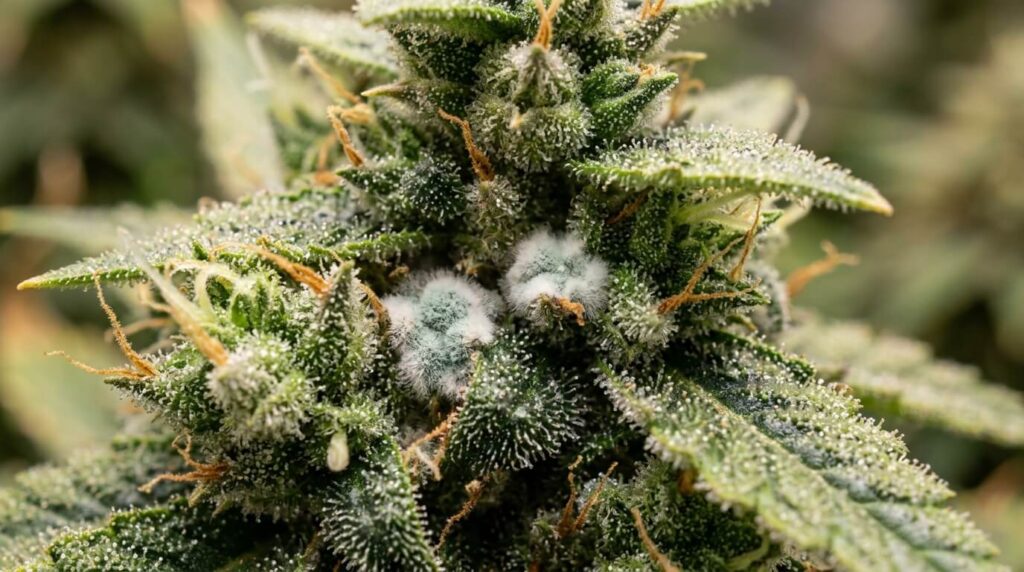
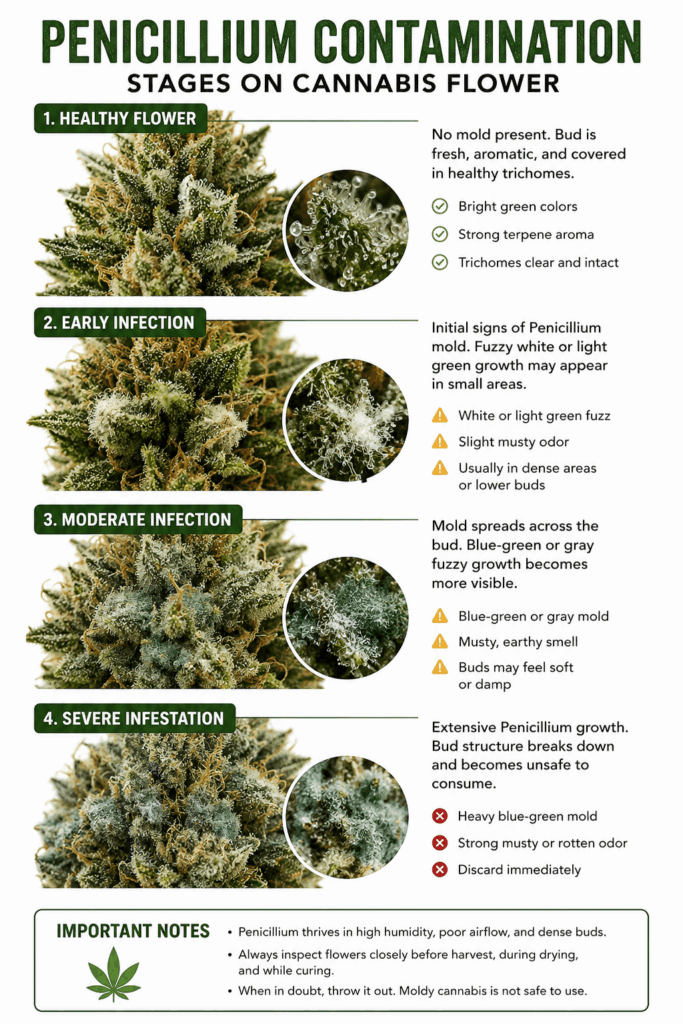
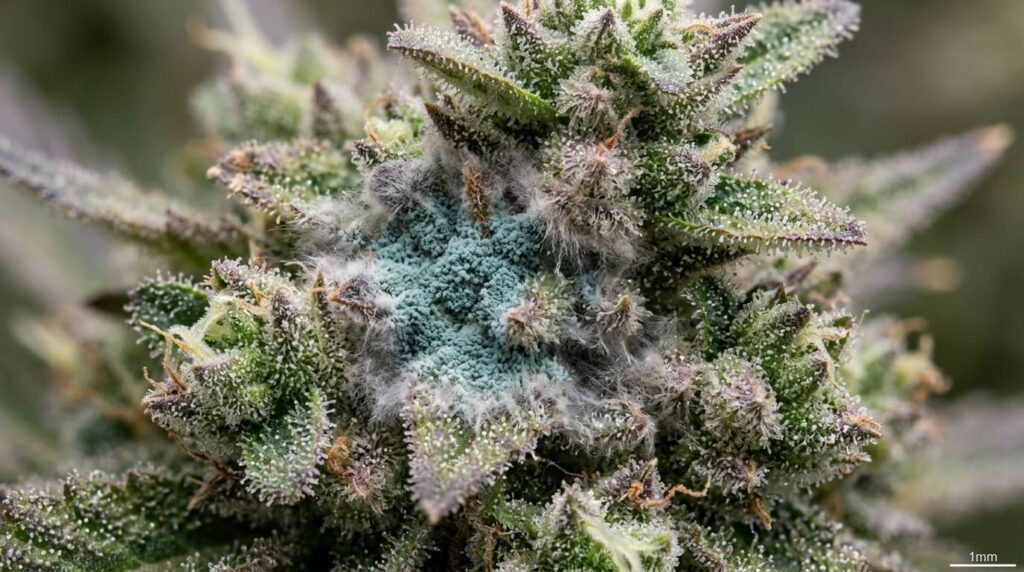
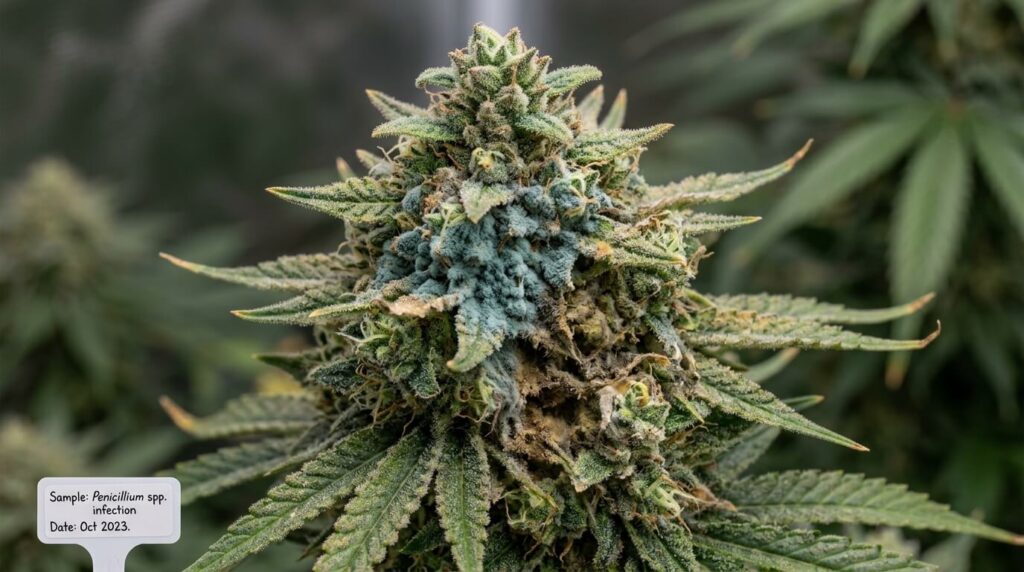
Healthy autoflower buds should appear vibrant, resinous, and heavily coated in trichomes. Penicillium has a very different appearance. Instead of glistening resin glands, it forms dull, fuzzy, or powder-like patches that spread across or within the flower.
Common symptoms include:
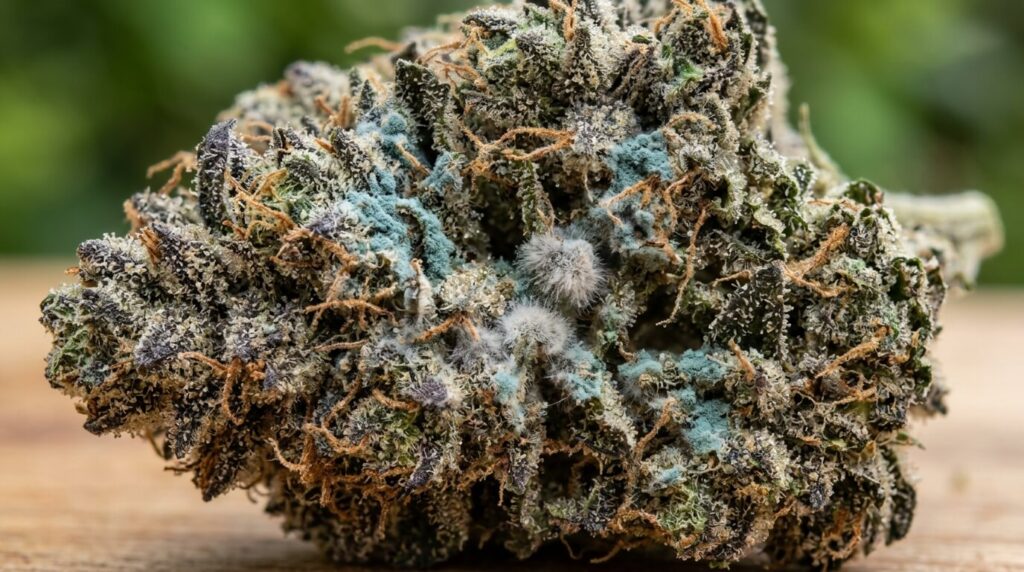
- White, gray, blue-green, or pale green fuzzy growth.
- Powder-like spores on the surface of buds.
- Soft or collapsing flowers.
- Brown or discolored plant tissue beneath the mold.
- A damp, earthy, or musty odor.
- Dust-like spores released when the bud is disturbed.
One thing I’ve learned after inspecting countless autoflowers is that the first visible mold is rarely where the infection started. If one cola shows signs of Penicillium, inspect every neighboring flower carefully, as spores often spread before symptoms become obvious.
Use a Jeweler’s Loupe to Confirm Your Findings
A jeweler’s loupe or handheld microscope with 30–60× magnification is one of the best tools for confirming whether you’re looking at mold or simply heavy trichome production.
| Healthy Trichomes | Penicillium Mold |
| Clear or milky resin glands with rounded heads. | Irregular fuzzy strands or powdery clusters. |
| Evenly distributed across the flower. | Random patches concentrated in one area. |
| Glossy and reflective under light. | Dull, dusty, or cotton-like appearance. |
| Strong terpene aroma. | Damp, musty, or earthy smell. |
Penicillium vs Other Cannabis Molds
Several fungal diseases can affect autoflower cannabis, but they do not all appear in the same way. Correct identification helps determine the next steps and prevents confusion between common pathogens.
| Pathogen | Typical Appearance | Most Common Location | How to Tell the Difference |
| Penicillium | White, gray, or blue-green fuzzy mold. | Dense buds, drying flowers, stored buds. | Fuzzy mold with powdery spores that often develops inside compact flowers. |
| Powdery Mildew | White powder coating. | Fan leaves and sugar leaves. | Forms a flat coating on leaf surfaces rather than inside buds. |
| Botrytis (Bud Rot) | Brown, decaying flower tissue. | Inside large colas. | Causes internal rot before external mold becomes visible. |
| Aspergillus | Often difficult to identify visually. | Stored flowers and seeds. | Frequently requires laboratory testing for confirmation. |
When inspecting flowering autoflowers, rely on more than your eyes. Look for unusual colors, smell each suspicious bud for musty odors, and gently feel for flowers that have become soft or collapsed. If anything seems different from the rest of the plant, isolate the affected bud immediately and inspect it under magnification before continuing with the rest of your harvest.
How to Eliminate Penicillium From Autoflower Plants
Once you’ve confirmed Penicillium on an autoflower, your priority is no longer saving the infected bud, it’s protecting the rest of the crop. Penicillium spreads through microscopic spores that are easily disturbed by handling, airflow, or trimming. Every unnecessary movement increases the risk of contamination reaching healthy flowers.
One mistake I often see is growers trying to “treat” mold with sprays or by cutting away only the visible growth. Unfortunately, once Penicillium has colonized a dense autoflower bud, the infection usually extends further than you can see. The safest approach is to isolate the affected material immediately and stop spores from spreading throughout the grow room.
Step 1: Isolate the Infected Autoflower
As soon as Penicillium is identified, reduce movement around the affected plant. Avoid touching neighboring colas, shaking branches, or carrying infected buds uncovered through the grow room.
| Immediate Action | Why It Matters |
| Isolate the affected plant if possible. | Prevents spores spreading to healthy autoflowers. |
| Turn off oscillating fans near the infected area. | Reduces airborne spore movement while you work. |
| Wear clean gloves. | Prevents transferring spores between plants. |
| Prepare a sealed disposal bag before cutting. | Allows infected material to be removed safely. |
Staying calm is important. Rushing often creates more contamination than the mold itself.
Step 2: Remove Contaminated Plant Material
Using clean, sanitized pruning scissors, remove infected buds or branches with as little disturbance as possible. If the mold is confined to a small section, you may remove the affected branch and continue monitoring the remainder of the plant. However, if Penicillium has spread through multiple colas or deep inside the main flower, removing the entire autoflower is usually the safest option.
Never attempt to save moldy buds for extracts, concentrates, or edibles. Likewise, do not compost infected material near your grow area, as spores can survive and spread back into future crops.
In my experience, sacrificing one heavily infected autoflower is far better than risking an entire tent filled with healthy plants.
Step 3: Inspect Every Remaining Plant
Once the infected material has been removed, inspect every autoflower using the same routine described in the previous section. Pay particular attention to neighboring plants, dense colas, and shaded sections of the canopy where spores are most likely to settle.
| Inspection Area | What to Check |
| Main colas | Hidden mold between the flowers. |
| Sugar leaves | Wilting or fuzzy growth around the leaf base. |
| Lower canopy | Damp flowers with poor airflow. |
| Drying buds | Musty smell or unusual discoloration. |
Finding one infected plant should always trigger a full inspection of the entire grow.
Step 4: Clean and Sanitize the Grow Space
After removing contaminated material, assume that spores are present throughout the growing environment. Begin by removing loose plant debris before cleaning all surfaces with an appropriate disinfectant or sanitizing solution.
Pay particular attention to:
- Pruning scissors and trimming tools.
- Pots and saucers.
- Drying racks.
- Fans and fan guards.
- Floors and corners.
- Work surfaces.
- Door handles and other high-contact areas.
I’ve found that cleaning first and sanitizing second is far more effective than spraying disinfectant onto dirty surfaces. Organic debris protects fungal spores, making sanitation less effective if the grow room hasn’t been cleaned thoroughly beforehand.
Step 5: Reset Before Continuing the Grow
Before returning to normal cultivation, make sure the environment is safe for the remaining autoflowers.
| Check | Recommended Action |
| Remaining plants | Inspect daily for new signs of Penicillium. |
| Tools | Sanitize before every use. |
| Growing equipment | Clean fans, trays, containers, and drying areas. |
| Growing media | Replace any media suspected of contamination. |
| Harvest equipment | Keep infected and healthy flowers completely separate. |
If the outbreak was severe or multiple plants were affected, I recommend performing a complete reset once the grow has finished. Remove all plant material, thoroughly clean the grow room, disinfect equipment, replace contaminated growing media where necessary, and inspect everything before introducing new autoflower genetics.
The most effective way to eliminate Penicillium from an autoflower grow is to act quickly, remove infected material without spreading spores, and restore a clean growing environment before the fungus has an opportunity to establish itself elsewhere. Fast, controlled action almost always saves more of the harvest than hesitation.
How to Prevent Penicillium on Autoflower Cannabis
Preventing Penicillium is far easier than eliminating it once it infects an autoflower. As you’ve already seen, Penicillium spores are almost impossible to avoid, but they only become a problem when the growing environment allows them to establish themselves. Successful growers don’t rely on fungicides or miracle products. They create conditions where mold struggles to survive from seedling through storage.
Autoflowers have one major advantage: their short life cycle. They also have one major disadvantage: once flowering begins, there is very little time to correct environmental mistakes. That means prevention needs to become part of every stage of the grow rather than something you think about once buds begin to swell.
Stage 1: Start With a Clean Growing Environment
The healthiest autoflowers usually begin in the cleanest grow spaces. Before planting a seed, clean pots, trays, propagation equipment, and work surfaces to reduce the number of fungal spores introduced into the grow.
Fresh growing media should always be stored somewhere dry, while reused containers should be washed and sanitized thoroughly before planting again. Good sanitation also helps reduce the likelihood of soil-borne fungal diseases such as Fusarium and root rot, both of which thrive in persistently wet growing conditions. If you’re growing outdoors, avoid placing pots directly beside compost heaps, piles of dead vegetation, or permanently damp areas where fungal spores naturally accumulate.
| Before You Plant | Why It Matters |
| Clean pots and trays | Reduces fungal contamination before plants establish. |
| Use fresh or properly stored growing media | Prevents introducing spores into the root zone. |
| Clean propagation equipment | Protects young autoflower seedlings. |
| Keep the grow area tidy | Removes organic material that supports fungal growth. |
Stage 2: Build Healthy Plants During Vegetative Growth
Strong plants cope with environmental stress better than weak ones. During the vegetative stage, your focus should be on creating steady growth while encouraging good airflow around developing branches.
Avoid overcrowding plants, particularly if you’re growing several autoflowers inside a small tent. As leaves begin to overlap, humidity pockets develop beneath the canopy, creating ideal conditions for fungal spores long before flowering begins.
One habit that’s served me well over the years is walking around every plant rather than viewing them from the front. Looking at your autoflowers from different angles quickly reveals crowded branches, poor airflow, or leaves trapping moisture that would otherwise go unnoticed.
| Vegetative Priority | Benefit |
| Space plants correctly | Improves airflow around every plant. |
| Water the growing medium, not the foliage | Reduces moisture on leaves and stems. |
| Remove damaged leaves promptly | Eliminates decaying plant material. |
| Maintain steady airflow | Prevents humid pockets developing beneath the canopy. |
Stage 3: Protect Dense Autoflower Buds During Flowering
Flowering is when Penicillium becomes a genuine threat. Modern autoflower genetics often produce compact, resin-rich colas that can trap moisture deep inside the flower, especially during the final weeks before harvest.
This is why daily inspections become part of my routine. I don’t just look at the top cola. I inspect the sides of the flowers, the lower canopy, and the shaded branches where humidity lingers longest. Spending five minutes checking plants each day is far easier than losing weeks of work to mold.
Keeping the environment stable is much easier when temperature, humidity, and airflow are all working together. During late flowering, many indoor growers aim for relative humidity between 40–50% and daytime temperatures of around 21–26°C (70–79°F). With steady airflow through the canopy, these conditions help prevent moisture from building up inside dense flowers without putting unnecessary stress on the plant.
Outdoor growers have less control over humidity, but they can still reduce the risk of fungal diseases by improving airflow around the plants and protecting them from long periods of wet weather.
| Environmental Factor | Recommended Practice |
| Relative Humidity | Maintain approximately 40–50% RH during late flowering where possible. |
| Temperature | Aim for 21–26°C (70–79°F) during lights-on periods. |
| Airflow | Maintain gentle air movement above, below and through the canopy without blowing directly onto buds. |
| Plant spacing | Prevent neighbouring colas from touching to improve ventilation. |
| Defoliation | Remove only enough foliage to improve airflow while avoiding unnecessary plant stress. |
| Irrigation | Water the growing medium rather than the flowers and avoid overwatering during late flower. |
Choosing suitable genetics also plays an important role. Some cultivars naturally produce tighter flowers than others, making them better suited to dry climates than humid environments. If you regularly battle high humidity, selecting resilient varieties such as Beginner Autoflower Seeds or Super Autoflower Seeds can significantly reduce the likelihood of mold problems.
Stage 4: Prevent Contamination During Harvest
Harvest is one of the easiest opportunities for Penicillium spores to spread between plants. Every bud is handled, trimmed, and moved multiple times, so cleanliness becomes just as important as environmental control.
Before harvesting, make sure every pair of scissors, trimming tray, drying rack, and container has been cleaned thoroughly. If one plant shows signs of Penicillium, harvest it separately and never trim contaminated flowers alongside healthy buds.
| Harvest Practice | Why It Helps |
| Harvest dry plants only | Reduces excess moisture entering the drying room. |
| Sanitize trimming tools regularly | Prevents spores moving between plants. |
| Separate suspicious flowers | Stops contamination spreading during processing. |
| Handle buds gently | Minimizes the release of fungal spores. |
Stage 5: Dry and Cure Autoflowers Correctly
Many growers assume the hard work ends after harvest, but poor drying conditions can undo months of careful cultivation. Freshly harvested autoflower buds continue releasing moisture as they dry, and if that moisture cannot escape evenly, Penicillium can develop surprisingly quickly.
Following proper drying and curing autoflowers practices is just as important as preventing mould during cultivation, as excessive moisture after harvest can quickly lead to contamination.
Dry harvested autoflower flowers in a clean, dark environment with temperatures of approximately 15–18°C (60–65°F) and a relative humidity of around 55–60%. Provide gentle indirect airflow around the hanging branches rather than blowing directly onto the buds, allowing moisture to leave the flowers gradually while reducing the likelihood of Penicillium developing during the drying process.
Once drying is complete, curing should continue in clean containers that are checked regularly during the first few weeks.
| Drying & Storage Practice | Benefit |
| Space branches evenly | Improves airflow around drying flowers. |
| Inspect buds daily | Detects contamination before it spreads. |
| Store only fully dried buds | Prevents moisture becoming trapped inside containers. |
| Cure in clean, airtight containers | Maintains quality while reducing contamination risks. |
| Check stored buds regularly | Identifies problems before entire batches are affected. |
Develop a Penicillium Prevention Routine
The best Penicillium prevention strategy isn’t a product. It is consistency. Every successful grow teaches you something about your environment. Keep records of temperature, relative humidity, seasonal weather patterns, airflow adjustments and any signs of fungal disease throughout each grow. Over several harvests, these observations make it much easier to recognise recurring environmental conditions that encourage Penicillium and to make small adjustments before problems develop.
From my own grows, I’ve learned that mold rarely appears because of one major mistake. It is usually the result of several small oversights happening at the same time. When clean cultivation practices, stable environmental conditions, careful harvesting, and proper drying all become routine, Penicillium has very few opportunities to establish itself on autoflower cannabis.
Penicillium Cannabis FAQ
Can an autoflower recover after developing Penicillium?
Once Penicillium has infected an autoflower bud, the affected flower cannot recover. Removing a small infected branch may allow the rest of the plant to finish if the contamination is caught early, but widespread mold usually means the entire plant should be discarded. Because autoflowers have a fixed life cycle, there is very little time for recovery once fungal infections become established.
Are some autoflower strains more resistant to Penicillium?
Yes. Plant structure plays a significant role in mold resistance. Autoflower varieties with more open flower structure and better airflow between buds generally perform better in humid environments than cultivars that produce extremely dense colas. If you regularly grow outdoors or in areas with high humidity, choosing mold-resistant autoflower genetics can significantly reduce the risk of Penicillium.
Can Penicillium spread while drying or curing autoflowers?
Yes. Drying and curing are common stages for Penicillium to develop if flowers retain too much moisture or contaminated buds are stored with healthy ones. Always inspect harvested buds before drying, provide adequate spacing between branches, and check curing jars regularly. Never combine suspicious flowers with clean harvests.
Does freezing or drying kill Penicillium?
No. Freezing or drying may slow fungal activity, but neither process guarantees that Penicillium spores are destroyed. Mold-contaminated autoflower buds should never be considered safe simply because they have dried or been frozen. If visible Penicillium is present, the affected flower should be discarded.
Can Penicillium return in the next autoflower grow?
It can if the source of contamination isn’t removed. Spores may remain on tools, pots, drying equipment, ventilation systems, or other surfaces after an outbreak. Before starting your next grow, thoroughly clean and sanitise your equipment, inspect your growing environment, and begin with fresh, healthy autoflower genetics. Eliminating the source of contamination is the best way to prevent Penicillium from returning.


