Bud Rot: What It Looks Like, What Causes It, and How to Prevent It
Bud rot is one of the most destructive problems cannabis growers can face during the flowering stage, especially when dense buds are exposed to high humidity and poor airflow. Caused by the fungus Botrytis, bud rot spreads quickly through infected colas and can ruin an entire harvest if left untreated. Early symptoms are often easy to miss, making regular inspection during late flower especially important. This guide explains what cannabis bud rot looks like, the environmental conditions that cause it, how to safely remove infected buds, and the best ways to prevent mold from affecting your crop.
Article Insights
- Bud rot is caused by Botrytis, a fungal pathogen that thrives in humid, stagnant conditions during flowering.
- Early signs include soft buds, browning sugar leaves, grey fuzz, and a sour or earthy smell coming from infected colas.
- Humidity above 55% during late flowering significantly increases the risk of mould spreading through dense buds.
- Poor airflow, overcrowded plants, rainfall, and large temperature swings can all trigger bud rot.
- Infected buds should be removed immediately using clean scissors and gloves to reduce the spread of spores.
- Sativa and airy-bud strains are often more resistant to mould than dense indica or modern hybrid genetics.
What Is Bud Rot and Why It’s a Serious Problem for Growers
Bud rot is one of the biggest threats a grower can face from the middle of the flowering period onwards. Botrysis is a harmful fungus that causes the dense and compact buds of a flowering cannabis plant to become soft, web-like and lifeless. Below explains why bud rot spreads so quickly and whether it is dangerous to smoke or consume dried cannabis buds that were infected with mold.
Why does bud rot (Botrytis) spread so quickly
Botrytis can spread through the air via wind currents, and once it comes into contact with a cannabis plant’s buds, it can cause damage. Below are the reasons why Botryosis spreads so quickly and how environmental factors affect its spread.
- Rainfall can cause Botrysis mould spores to splash and travel onto other buds
- Poor air circulation around dense buds causes mold to spread to other colas
- High humidity levels during the last 4 weeks of flowering will spread mould faster
- Spores can be transferred to other buds by insects or pests
- Physical contact with infected buds can spread more spores to other colas
- Cold or hot temperatures can cause buds to mould
Is bud rot dangerous to smoke or consume?
Yes, and you should never harvest or smoke mouldy buds. Mold is a fungus that attaches to the bud. Smoking dried cannabis buds, hash or extracts that contain mould spores may cause respiratory problems such as excessive coughing and a tight chest. Long-term effects of smoking mould can be seriously bad for your health!
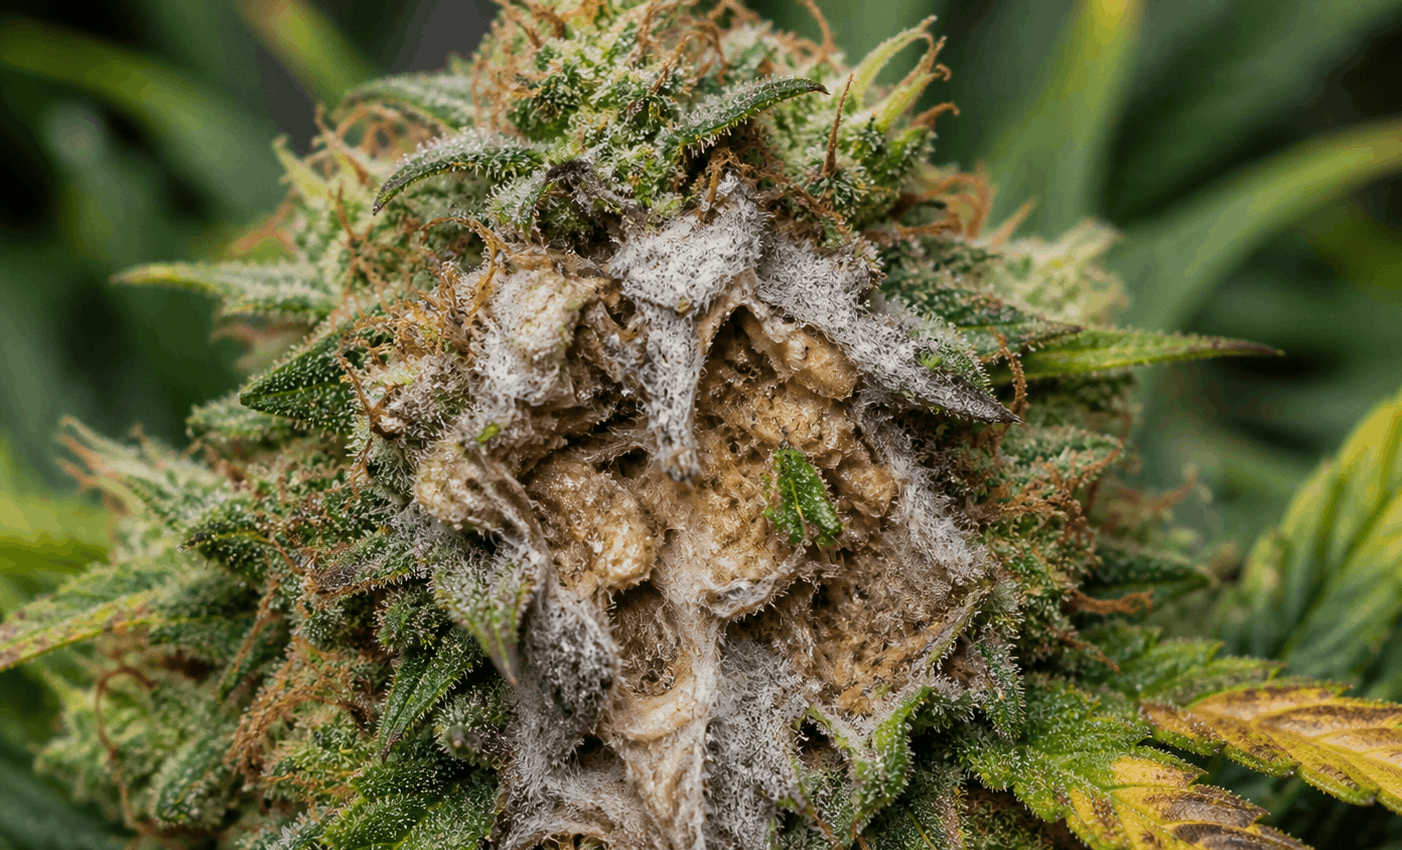
What Does Bud Rot Look Like and Smell Like?
Sometimes you won’t even know your buds are mouldy until it’s too late. However, knowing what to look for and the early signs of bud rot can help save your yield and, hopefully, solve the problem altogether. Below explains the early signs, advanced symptoms and visual clues, what bud rot smells like and how to tell the difference between Botrytis and other moulds.
Early signs of bud rot most growers miss
- The buds feel soft, airy, with a candy floss texture
- There will be dark brown, grey, or black spots on the buds
- The smaller surrounding sugar leaves become brown and dry
- A hairy, web-like fuzz is starting to form on the buds and stems
Advanced symptoms and visible bud damage
- The entire cola has a dark brown and mushy feeling when squeezed
- Affected buds will have no terpenes and smell like an earthy, bitter, sour aroma
- The small branches connecting the bud to the stem will wilt and become soft
- Buds will shrink in size as their structure turns into a soft, web-like structure
What does bud rot smell like?
Botryis, once it gets a hold of your plants and spreads at will, can cause the colas to turn brown and produce a rotting smell. The smell can be described as an eye-squinting, sour, ammonia-rich, earthy funk. There will be no terpene-rich aroma of the strain, and that will be replaced with a mushroom and forest floor earthy smell.
How to tell the difference between bud rot and other mould
If you are reading this and thinking there are other types of mould? Then yes, but the only one that will significantly affect your yields is Botrytis. However, each of the different pathogens a grower may face is covered below.
Grey Mold Symptoms:
- Grey mould produces a fine, hairy layer on the surface of the buds
- Unlike Botrysis, Grey mould does not affect the inside of the buds
- It will produce a damp and musty smell, ruining the original smell
- Usually occurs after harvest when drying buds in cold stagnant conditions
What Causes Bud Rot in Cannabis Plants?
There are many factors in the equation for what causes bud rot. Your growing environment plays a massive role in how susceptible your flowering crop is to mould. Plant health and genetics can also make a big difference, so below explains all the causes of Botryosis.
High humidity and excess moisture explained
We all love thick, dense buds the size of a Coke can, but without adequate fresh air and airflow, bud rot will quickly spread from the inside out and from cola to cola. High humidity levels and excessive moisture levels during the flowering period cause bud rot to spread quickly.
- Humidity levels above 60% create a high-risk environment for mould
- Warm and humid environments allow buds to accumulate moisture
- Cold grow spaces with high humidity can increase moisture levels
- Use a digital hygrometer to check the temperature and humidity 24/7
Poor airflow and ventilation issues
For some growers with a low plant count, trying to harvest as much bud as possible every 3-4 months is the only strategy that works for them. This usually means plenty of plant training, a long vegetation period and chunky sticky colas everywhere in sight!
Often in this scenario, grow rooms do not receive sufficient airflow or currents passing through. The biggest and best buds are usually the first to be affected by mould. A good tip is to use multiple oscillating fans in your grow room at different heights.
Dense buds, plant genetics, and susceptibility
I have learnt the hard way, especially outdoors, that bigger is not always better. It was not that long ago that over 60% of my outdoor crop had to be thrown away due to a severe mould problem caused by high humidity and heavy rainfall.
Plant genetics can influence a plant’s resistance to mould. For example, sativa cannabis plants are less prone to mould due to their airy, fluffy bud structure; however, some indica and hybrid plants can be grown with zero mould problems. It is best to research which cannabis strains are the most resilient and resistant to mould and mildew.
Environmental triggers like rain, temperature, and growing conditions
Indoors, you can create the exact growing conditions you want, and that means you do not need to worry about rainfall. Then again, dialling in the perfect growing environment so that mould cannot infect or spread through your crop is imperative.
- Large temperature drops at night can be favourable to mould
- High temperatures and stagnant air can also cause mould to spread
- Outdoor plants affected by rain absorb moisture, causing mould
- Overwatered plants increase humidity levels, causing moisture to rise
How to Stop Bud Rot Once It Appears
When you notice one of your plants showing signs of bud rot, act fast and get ready to take action! Removing infected buds safely and effectively can be a massive difference-maker in how well you prevent mould spread, as explained below.
Removing infected buds safely and effectively
Before you do anything, you will need to make sure that you have the following equipment:
- Latex gloves
- Sharp and clean scissors
- Isopropyl alcohol
- Plastic rubbish bag
Wearing latex gloves, carefully handle the colas and identify which buds have turned brown or grey and reduced in size. Usually, the small twig attaching the bud to the stem will be mouldy and easy to cut away. Work bud by bud, and only cut away the buds with signs of mould.
Cut away the mouldy buds and throw them into the plastic rubbish bag.
After you have finished removing any contaminated buds, you can discard the gloves into the rubbish bag, then proceed to sterilize the scissors with isopropyl alcohol. I would advise you to check your buds every day for any signs of spreading.
One habit that you must develop is not touch the other buds and surrounding plants after coming into contact with infected buds. Mold spores can easily spread this way and is a common mistake made by beginner level growers.
Can you save affected plants, or is it too late?
As painful as it is to hear and do, yes, it is too late. Save the discolored, earthy-smelling buds; however, with the right protocols, you can still save the surrounding buds that appear fine and unaffected. Side branches and smaller-sized buds are not as heavily affected as the chunky top colas.
How to Prevent Bud Rot and Protect Your Harvest
The best way to prevent bud rot is to ensure your environmental conditions are on point. Below explains how to prevent bud rot and protect your harvest until the day you chop your plants.
How to prevent bud rot with proper humidity control
During the lifecycle of your cannabis plants, they will require different humidity levels. During the seedling and vegetation stage, cannabis plants enjoy a warm and humid environment. Once buds begin forming, it is necessary to lower humidity levels between 40-50%.
Once humidity exceeds 55%, you increase the risk of inviting Botrytis into your garden. I find that 45% works a treat at preventing mould and produces the frostiest and most resinous buds possible. A digital hydrometer will show you the humidity levels and the difference between the lowest and highest readings over 24 hours.
Improving airflow and spacing in your grow
Even if you think your grow room has optimal airflow and is very well ventilated, once your plants begin to flower, airflow is significantly affected. Those big colas closest to the grow lights are more likely to become mouldy.
When using grow tents, I actually add 2 clips to connect the oscillating fans to the poles. Both fans will be aimed at the top of the plants and will oscillate at different times. As long as your humidity levels are below 55%, you should be able to make it to the finishing line pathogen-free!
Rasing your grow lights will help keep the air around the buds much cooler, which can be a major help during the final 3-4 weeks. Do not let the buds on your plants touch the walls of your tent or room, and use bamboo canes to support any drooping branches that have become to heavy.
Strain selection and growing techniques to reduce risk
Some stains are better suited than others for fighting mould. Skunk and old-school genetics seem to be generally better suited and more mould-resistant than most modern-day Zkilttles crosses. Autos are fantastic for growers who do not want to run into any mould issues. Autos are much easier to maintain and produce a large volume of medium-sized nugs.
Indoor vs outdoor prevention strategies
No matter if you are growing indoors in a large, expensive growing facility or have a single outdoor plant growing in a pot, mold can be just as costly. Below are the different prevention strategies for indoor and outdoor growers to consider.
Indoor prevention:
- Use a digital hygrometer to monitor the humidity and temperature
- Do not exceed 55% humidity during the final 4 weeks of 12/12
- Avoid overwatering your pots, especially during the flushing stage
- Increase air flow during flowering by adding more oscillating fans
- Evenly space the plants to allow an even distribution of air flow
- Do not let the temperature drop at night exceed 6 degrees Celsius
- Cut away and discard into the rubbish any discolored and affected buds
- Temperatures above 25 degrees Celsius can encourage bud rot to spread
Outdoor prevention:
- Do not let large-sized colas touch one another
- Create a rain cover for nighttime and when it rains
- Use bamboo canes to evenly spread out sie branches and colas
- Prune away fan leaves to help improve air flow around the buds
FAQs About Cannabis Bud Rot
What causes bud rot in cannabis plants?
Bud rot is caused by Botrytis, a fungal pathogen that spreads through humid conditions, stagnant air, and excess moisture inside dense buds.
What does cannabis bud rot look like?
Bud rot often starts as brown or grey patches inside dense colas. Affected buds become soft, mushy, dry, or web-like and may develop fuzzy mould growth.
What does bud rot smell like?
Infected buds commonly produce a sour, earthy, musty, or ammonia-like smell instead of the normal terpene aroma of healthy cannabis flowers.
Can you smoke cannabis with bud rot?
No. Cannabis affected by bud rot should never be smoked or consumed, as mould spores may irritate the lungs and respiratory system.
How fast does bud rot spread?
Bud rot can spread very quickly in warm, humid environments with poor airflow. Spores may move between buds through air circulation, physical contact, or insects.
What humidity prevents bud rot?
Most growers aim to keep humidity between 40–50% during flowering, especially in the final 4 weeks before harvest.
Can outdoor cannabis plants get bud rot?
Yes. Outdoor plants are highly vulnerable to bud rot during periods of rainfall, cold nights, morning dew, and high humidity.
Which cannabis strains are more resistant to bud rot?
Airy sativa genetics and some autoflower strains are commonly considered more resistant because their buds retain less trapped moisture than dense indica varieties.