Spider Mites on Autoflowers: How to Identify, Treat and Prevent Infestations
Spider mites are one of the most destructive pests that cannabis growers can encounter, and they can become a serious problem in a surprisingly short amount of time. These tiny pests feed on plant tissue, causing leaf damage, reduced vigor, and in severe cases, lower yields and web-covered buds. The challenge is that spider mites are often difficult to spot until a population is already established. In this guide, you’ll learn how to identify spider mites on autoflower cannabis plants, recognize the warning signs, treat infestations effectively, and reduce the risk of future outbreaks.
- What Are Spider Mites on Cannabis Plants?
- Why Spider Mites Are More Damaging to Autoflowering Cannabis Plants
- Common Signs and Symptoms of Spider Mites on Cannabis
- How To Detect and Get Rid of Spider Mites on Cannabis
- How To Prevent Spider Mites on Cannabis Plants
- Frequently Asked Questions About Spider Mites on Cannabis Plants
What Are Spider Mites on Cannabis Plants?
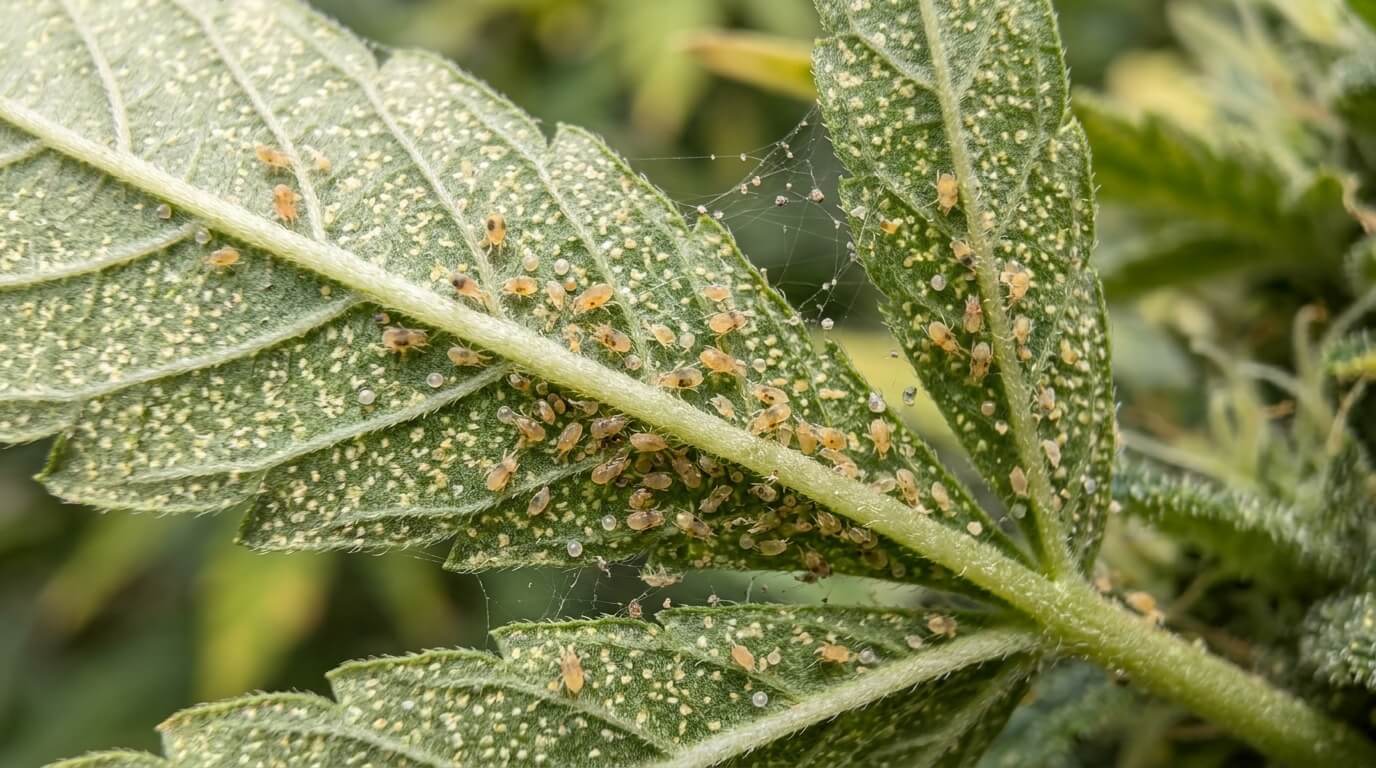
Spidermites are one of the most destructive pests growers can encounter and are often considered among the worst cannabis pests due to how quickly they can spread throughout a grow room. A spider mite infestation can appear out of nowhere, and before you know it, there are webs scattered between your best buds. Below explains what spider mites look like, their lifecycle, and why they can quickly spread and wipe out your crop.
What cannabis spider mites look like

You will not be able to see spider mites up close unless you have good eyesight, and you may need to use a magnifying glass to get a closer look. Below, you’ll find what spider mites look like so you can double-check your plants.
- Almost invisible to the naked eye, they grow to 0.5 mm in size
- They have an oval-shaped body with eight legs
- They can range in color from red, brown, green or yellow
- They gather in clusters and hide on the undersides of leaves
Unlike soft-bodied pests like thrips or aphids, spider mites have a hard outer shell, which is what makes them much harder to try to kill.
The spider mite lifecycle explained
You will need to act fast if you spot spider mites in your grow room, because they can multiply rapidly under the right conditions. Below is an explanation of the spider mite lifecycle.
Egg Stage: The egg is laid on the underside of the leaf, secured with webbing.
The eggs will hatch within 4-7 days. Female spidermites will live for 30 days, and within that time frame, will reproduce and lay hundreds of eggs and increasing the population at a rapid rate.
| Lifecycle Stage | Description | Timeframe |
| Egg | Eggs are laid on the underside of leaves and secured with webbing | 4–7 days |
| Larva | Six-legged larvae emerge and begin feeding | 1–3 days |
| Protonymph | Develops eight legs and becomes more mobile | 1–3 days |
| Deutonymph | Continues feeding and growing larger | 2–4 days |
| Adult | Fully mature spider mite capable of reproduction | Up to 30 days |
Why spider mites spread quickly in grow rooms
Female spider mites can lay 200-300 eggs within 30 days. If you consider that the eggs hatch within 5 days, you can see how quickly a spider mite population could get out of hand and result in serious crop damage. Grow rooms can create ideal environments for spider mites to thrive and spread. When there are no predators around, spider mites can reproduce at will.
Why are spider mites dangerous for cannabis plants
- Spider mites will damage the leaf surface, causing tiny yellow bite marks
- Plants suffering from spider mites will produce lower yields
- Spidermites can spread through air currents and travel from plant to plant
- A bad infestation with webbing can destroy a crop
- It is difficult to treat spider mites with sprays during the flowering stage
- Spidermites are tough and are resistant to many pesticides
Why Spider Mites Are More Damaging to Autoflowering Cannabis Plants
Spider mites can cause significant damage to any cannabis plant, but autoflowering varieties face unique challenges when dealing with an infestation. Unlike photoperiod strains that can remain in the vegetative stage for as long as needed, autoflowers follow a predetermined lifecycle and will begin flowering regardless of their health or size.
This means that every day spent fighting spider mites is time that the plant cannot recover. Damage that occurs during the seedling or early vegetative stage often results in smaller plants, fewer bud sites, and lower yields at harvest.
When spider mites feed on autoflower leaves, they reduce the plant’s ability to photosynthesise efficiently. As energy production declines, growth slows and the plant may struggle to reach its full genetic potential before flowering begins.
Growers should pay particular attention to autoflowers during the first four weeks of growth, as this is the period when plants establish their structure and canopy. This is especially important when growing autoflower seeds for beginners, as early pest damage can have a lasting impact on plant development.
Spider Mite Impact on Autoflowers vs Photoperiod Plants
| Factor | Autoflowering Cannabis | Photoperiod Cannabis |
| Recovery Time | Limited | Extended |
| Ability to Delay Flowering | No | Yes |
| Impact of Early Damage | High | Moderate |
| Yield Loss Potential | High | Moderate |
| Time Available for Recovery | Fixed Lifecycle | Grower Controlled |
| Sensitivity to Stress | Higher | Lower |
For growers cultivating autoflowering cannabis, regular inspections and early intervention are especially important. Even a small spider mite population can affect plant development during critical growth stages, making prevention and early detection essential for achieving maximum yields.
Common Signs and Symptoms of Spider Mites on Cannabis
If you can identify a spider mite problem early, you may be able to eradicate them sooner rather than later and save your crop. There will be a long list of signs that your plants are suffering from a spider mite population. Below are all of the different signs you have a spider mite infestation and how to tell the difference between spider mite damage and a nutrient deficiency.
| Symptom | What It Looks Like | Severity |
| White or yellow speckles | Tiny spots on leaf surfaces | Early |
| Pale or yellow leaves | Loss of chlorophyll and vigor | Moderate |
| Leaf curling | Leaves become dry and distorted | Moderate |
| Webbing | Fine webs around leaves and buds | Severe |
| Visible mites | Moving dots under leaves or on webs | Severe |
Tiny white or yellow speckles on leaves
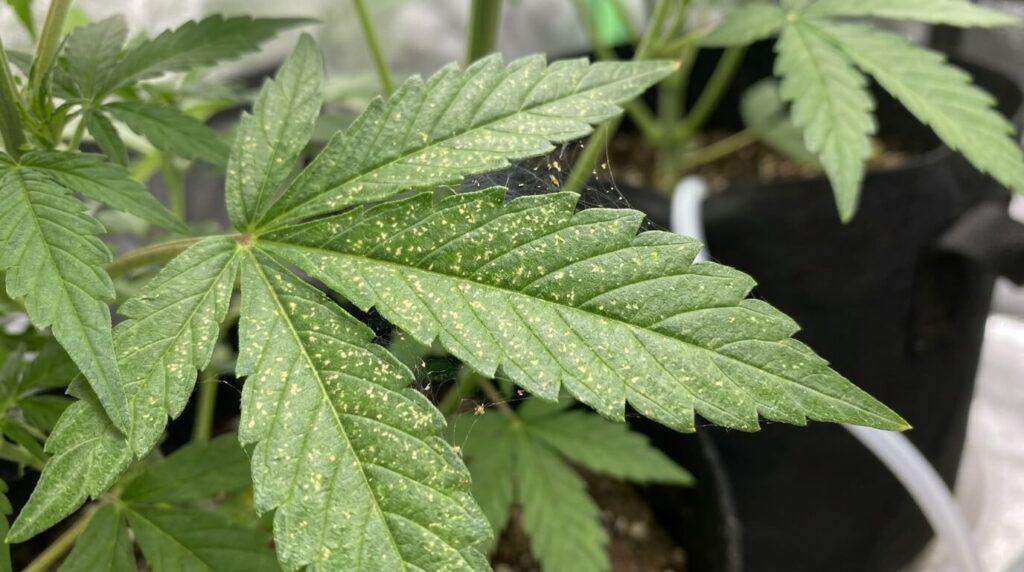
If you stand above your plant and look down, you will see that the fan leaves closest to the lights have speckles. When you examine the leaves closely, you will see tiny golden, orange, or yellow speckles. Unfortunately, those tiny speckles are the result of the spider mites have sucked the life out of the leaf surface when feeding.
Yellowing leaves on cannabis plants
Whilst leaving behind a trail of destruction on the leaf surface, spider mites suck off the chlorophyll from the plant tissue and cells. This causes the damaged leaf to turn yellow and pale. What you may think is a nutrient deficiency is actually the leaf being damaged beyond repair.
Fine webbing under leaves and around buds
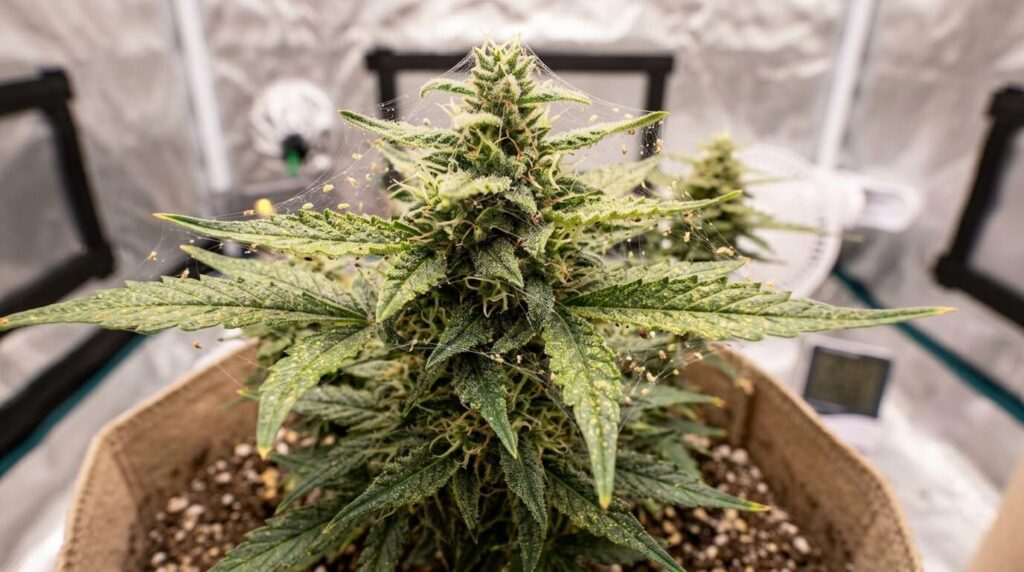
I remember, when I was younger, seeing spider webs forming on the tops of my best colas, and I freaked out. It was the first time I ever experienced spider mites, and I already knew once you see webs, you were in big trouble! Spider mites will weave webs between the buds and internodes, as well as on the underside of the leaves.
Leaf curling or drying out
If you notice that your yellowing and pale leaves are curling or drying out, then this is another sign that you have spider mites. Because the leaf has been stripped of chlorophyll, losing its green essence and vibrancy, it will slowly become brittle and lifeless.
Tiny moving mites on the underside of leaves
I think this is the one moment when every grower’s heart skips a beat. When you check the undersides of the plant’s leaves or the nodes where buds are forming, you see tiny mites moving around. They can also be seen freely roaming the web.
Spider mite damage vs nutrient deficiencies
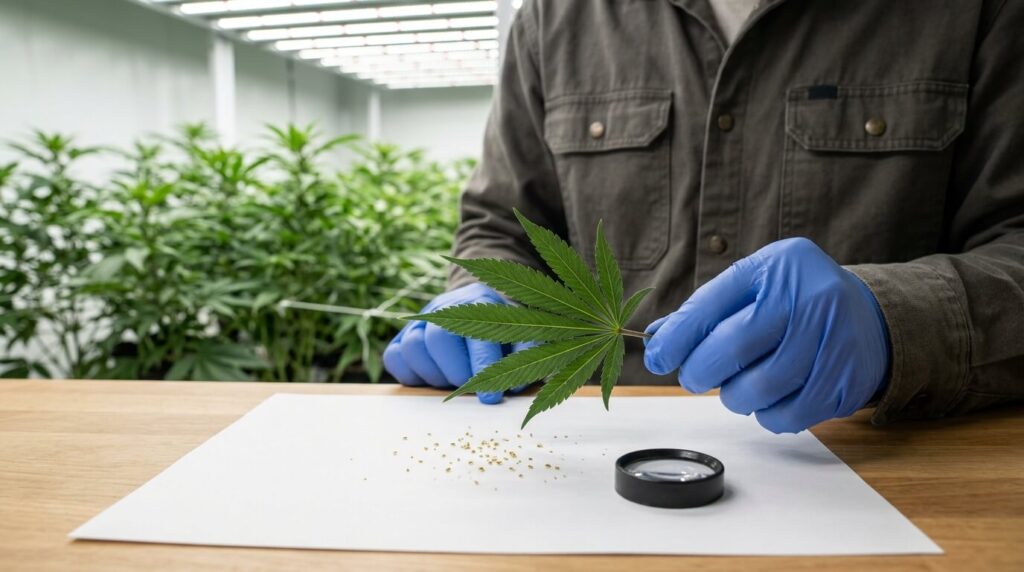
Yellow speckles on leaves and curling, dry, crispy leaves will indicate that spider mites have used the leaf as a food source. However, other pests such as cannabis leaf miners can also cause visible leaf damage that growers may mistake for nutrient issues. A nutrient deficiency can appear similar, further confusing matters. Damage from broad mites on cannabis can also resemble some of the symptoms caused by spider mites, making accurate identification important. One way to tell if you have spider mites or are simply experiencing a nutrient deficiency is to take a white piece of blank paper.
Check the top side of the leaf for speckles or signs of damage, and check the undersides for webs or tiny mites moving around. Vigorously shake the leaf over the paper, and check what falls onto it. If the paper remains clean, and there are no physical signs of mites, and you have a deficiency, you need to amend.
| Feature | Spider Mites | Nutrient Deficiency |
| Yellow speckles | Yes | Rare |
| Visible insects | Yes | No |
| Webbing present | Yes | No |
| Leaf curling | Common | Sometimes |
| Damage pattern | Random spots | Usually uniform |
| White paper shake test | Mites fall onto paper | Nothing falls |
How To Detect and Get Rid of Spider Mites on Cannabis
The first step in the great spider mite battle is learning to detect and identify them. After that, you will be ready to fight them off with various deterrents and treatments. Below breaks down how to easily spot spider mites and how to create an effective spider mite treatment schedule.
How to Identify Spider Mites Early on Cannabis Plants
Spider mites can be passed from grower to grower through contaminated clones. Other pests, including mealybugs, can also hitchhike into a grow room through infected plant material. They can also float on wind currents, land on clothes or pets, or enter via intake fans. Either way, developing the skills to identify spider mites early on will be extremely advantageous.
- Using a magnifying glass, examine the leaf surface for speckles
- Check the undersides of leaves for webbing
- Shake the leaves over a piece of white paper
- Monitor leaf health and look for pale, dry and curling leaves
- Webbing will appear between nodes, leaves and buds
Isolating Infected Cannabis Plants to Stop Infestations
The best thing you can do when you discover your favourite plant is covered in spider mites is to separate it from the other plants. Of course, for many growers who only have one grow space and one light, this is not practical advice; those who can should isolate and separate the healthy, unharmed plants. Isolating the plant allows you to better treat it in a controlled environment.
The Best Spider Mite Treatments for Cannabis Plants
- Diatomaceous earth spread on the leaves can slow down a spider mite infestation
- Wiping leaves with isopropyl alcohol can be a good deterrent
- A pressurised spray gun will spray the mites of the leaves and buds
- Synthetic chemical products can be used to treat spider mites
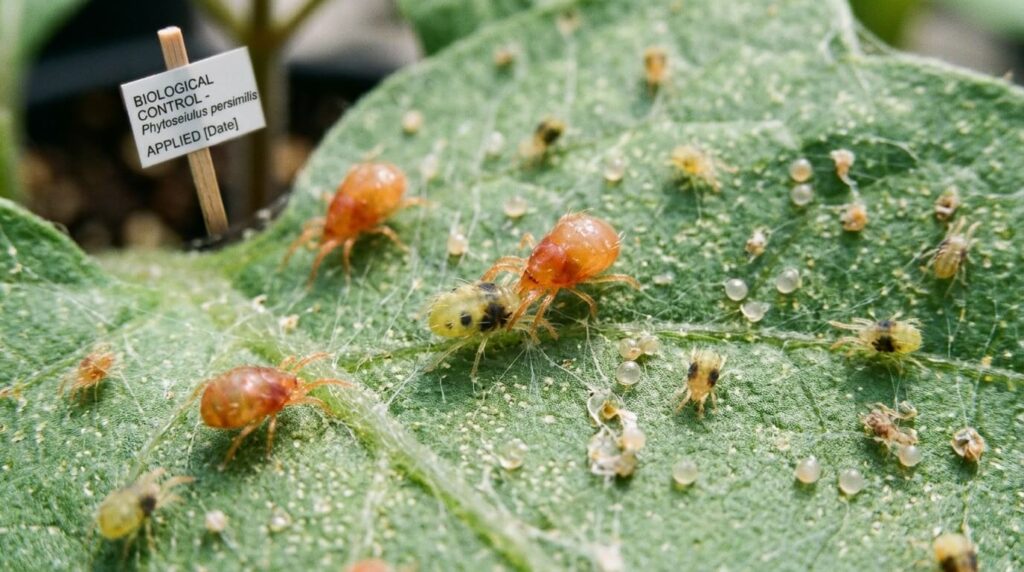
- Predatory insects: Stethorus beetles, lacewings, and predatory gall midges
- Rubbing neem oil onto the undersides of the leaves displaying signs of damage
| Treatment Method | Effectiveness | Best Used During |
| Water spray | Moderate | Early infestation |
| Neem oil | High | Vegetative stage |
| Isopropyl alcohol | Moderate | Spot treatments |
| Diatomaceous earth | Moderate | Prevention and control |
| Predatory insects | High | Ongoing biological control |
| Chemical miticides | Very High | Severe infestations |
Creating an Effective Spider Mite Treatment Schedule
When creating an effective protocol to prevent or control spider mites, it is important to act quickly before the population gets out of hand and becomes extremely difficult to control. Below is a step-by-step guide to effectively treating spider mites.
- Step 1: Isolate the plant away from the grow room
- Step 2: Spray the spider mites off the leaves using water
- Step 3: Use organic or chemical-based treatments on the leaves
- Step 4: Carefully monitor over the next 24 hours
- Step 5: Repeat this process every 3 days.
| Day | Action Required |
| Day 1 | Isolate affected plants and spray with water |
| Day 3 | Apply chosen treatment and inspect leaves |
| Day 6 | Repeat treatment and remove damaged foliage |
| Day 9 | Check for new webbing and mites |
| Day 12 | Reapply treatment if necessary |
| Day 15 | Conduct final inspection |
How To Prevent Spider Mites on Cannabis Plants
Preventing spider mites in the first place will allow you to sleep well at night without worrying about the arduous battle required to get rid of them. Below are the ideal growing conditions for spider mites, the importance of cleaning and maintaining a pest-free grow space, quarantine of new plants, and long-term prevention techniques and monitoring strategies.
Creating the Ideal Grow Room Environment to Prevent Spider Mites
Like all pests, they have their own preferences and optimal environmental conditions in which they thrive and reproduce quickly. Creating a favourable environment for spider mites is like an open invitation to your grow room. Below highlights the ideal growing conditions to prevent spider mites and the extra precautions to follow.
- Spider mites love hot and dry grow rooms with poor ventilation. Make sure you have good airflow and avoid hot temperatures.
- Low humidity below 40% is optimal for spider mites, so during vegetative growth, aim for 60-70% humidity, and lower it to 45% during the flowering stage.
- Space pots wide apart so they are not touching one another. When plants are touching, motes can easily transfer to other plants.
- Temperatures above 27°C / 80°F are ideal for spider mites to reproduce. Use a digital hygrometer and monitor how hot or cool the grow room becomes.
| Environmental Factor | Recommended Range | Spider Mite Preference |
| Temperature | 22–26°C (72–79°F) | Above 27°C (80°F) |
| Humidity (Vegetative) | 60–70% | Below 40% |
| Humidity (Flowering) | 40–50% | Below 40% |
| Airflow | Strong circulation | Poor ventilation |
| Plant Spacing | Adequate spacing | Crowded plants |
Cleaning and Maintaining a Pest-Free Grow Space
There is no better feeling than harvesting your plants and doing a deep clean of the grow room or grow tent. Especially if you have just ended a spidermite-nightmare. When cleaning and maintaining a pest-free grow space, you should want to:
- Sweep and keep the grow room floor tidy and free of dust and debris
- Wash your grow room/tent using a bleach and hot water solution
- Mop the grow room floor once a week
- Remove any organic matter, like dead leaves
Quarantining New Cannabis Plants and Clones
If you suspect you have accepted clones from another grower that contain spider mites, you will need to take extra steps to keep them quarantined until you can get rid of the mites. During this time, you will be meticulously checking the leaves for damage, applying organic or synthetic treatments, sprays or soaps and repeating the process.
If you notice that there are no physical signs of spider mites, no more webs are forming, no new leaves are damaged, and the plants appear perky and happy, then you will be able to reintroduce the plant back into the grow room.
Long-Term Spider Mite Prevention and Monitoring Strategies
The best way to stay on top of a constant threat from spider mites is to take preventive measures weekly. This involves doing daily checks and being ready to spring into action if needs be!
- Checking the tops and undersides of fan leaves every 24 hours
- Shaking leaves to see if spider mites fall onto white paper
- Removing badly damaged, dry or curling leaves
- Introducing predators to battle the spider mite population
- Avoid taking clones that run the risk of spider mites
Frequently Asked Questions About Spider Mites on Cannabis Plants
Can spider mites kill cannabis plants?
Spider mites rarely kill mature cannabis plants outright, but a severe infestation can significantly reduce plant health, stunt growth, and lower yields. If left untreated, spider mites can completely destroy leaves, contaminate buds with webbing, and make harvested flowers unusable.
What causes spider mites on cannabis plants?
Spider mites can enter a grow room through contaminated clones, clothing, pets, tools, or intake fans. Outdoor plants are especially vulnerable, as spider mites can travel on wind currents and quickly spread between plants.
Are spider mites visible to the naked eye?
Spider mites are extremely small, measuring around 0.5 mm in size. While they can sometimes be seen as tiny moving dots on leaves, a magnifying glass makes identification much easier.
What do spider mites look like on cannabis leaves?
Spider mite damage appears as tiny white, yellow, or bronze speckles on the surface of cannabis leaves. As the infestation worsens, leaves may become pale, dry, curled, and eventually die.
How quickly do spider mites reproduce?
Spider mites reproduce rapidly under warm, dry conditions. Eggs can hatch within 4 to 7 days, and females may lay hundreds of eggs during their lifetime, allowing populations to explode in a short period.
Can spider mites spread from plant to plant?
Yes. Spider mites spread very easily between cannabis plants. They can crawl between touching leaves, travel on air currents, or be transferred by growers when handling infected plants.
Can cannabis plants recover from spider mite damage?
Cannabis plants can recover from minor infestations if spider mites are detected early and treated quickly. However, severely damaged leaves will not repair themselves and may need to be removed.
Are spider mites worse indoors or outdoors?
Spider mites can occur in both environments, but indoor grow rooms often provide the warm, dry conditions that allow populations to reproduce quickly. Outdoor plants benefit from natural predators that help keep spider mite numbers under control.
Can spider mites survive after harvest?
Spider mites can survive on plant material left behind after harvest. This is why thoroughly cleaning and disinfecting the grow room between cycles is essential to prevent future infestations.
What is the fastest way to get rid of spider mites on cannabis plants?
The fastest approach is to combine multiple control methods, including isolating infected plants, physically removing mites with water sprays, applying appropriate treatments, and repeating the process every few days to eliminate newly hatched mites.
Do spider mites affect autoflowering cannabis plants differently?
Yes. Autoflowering cannabis plants have a fixed lifecycle, meaning they have less time to recover from stress and damage. An infestation during the early growth stages can reduce plant size, bud development, and final yields more significantly than on photoperiod plants.
What humidity level prevents spider mites?
Spider mites thrive in dry conditions. Maintaining relative humidity between 60–70% during vegetative growth and around 45–50% during flowering can help make the environment less favourable for spider mite populations.